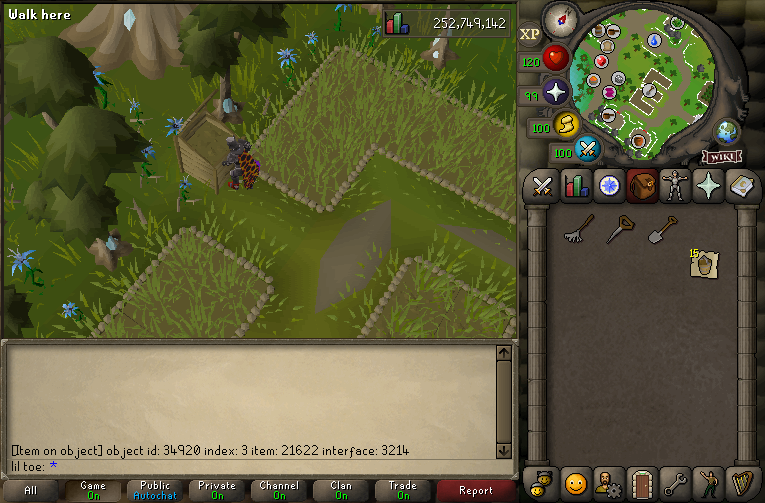
toe
-
Content count
20 -
Joined
-
Last visited
-
Days Won
5
Posts posted by toe
-
-
3 hours ago, CodeRED said:Can anyone tell me how i'm supposed to get ultracompost? I tried to mine volcanish ash and it won't work
Check the following guide:
https://www.runewild.com/forums/topic/8024-farming-skilling-guide/#comment-38356_wrap
0 -
Prices updated - December/23
0 -
Topic updated with BH + Dt2 items (will be updated again once Dt2 items stabilize in price)
0 -
4 hours ago, Thin said:Hey Guys,
I'm new to the forums but have been playing for a few years now. Is it possible to get my rank on the forums too im ultimate.
Thanks
Verify your account in ::guide. Forums accounts are associated with ingame rank
0 -
2 hours ago, FIllIIllIlIN said:idk why but i can log in to forums fine but when trying to log ingame it says invalid username/password, tried to recover it 10 times with email but i never even got one on my email.
Ingame username: FIllIIllIlIN
Issue you are experiencing: i can log in to forums fine but when trying to log ingame it says invalid username/password, tried to recover it 10 times with email but i never even got one on my email.
Easiest way to recover a password is through our support discord (https://discord.gg/zc4GZW84). Create a ticket at #account-recovery and follow their format
0 -
17 hours ago, trav scott said:How do I plant crystal trees? cant figure out how to get the sappling or crystal acorn or anything.
Use the Crystal acorn on a Filled plant pot and then water it with a Watering can. You can plant the Crystal sampling in Prifddinas (Farming lvl 74+)
0 -
On 10/07/2023 at 9:21 AM, dozer2 said:What are the time differences between max melee and range + mage
Max melee is kinda reliable on dwh/swh hitting. Range/mage is easier/more afkable. Regardless I’d say melee is faster on most occasions.
1 -
Crop Types / Growth Timers
Crops and trees can be farmed in allocated farming patches, which can be found in several places. All farming patches are divided into a category; therefore, seeds can only be grown in certain patches.
Allotment patch
Allotments are farming patches that players can grow vegetables and fruits in. Three allotment seeds are needed to plant in each allotment patch. Allotments are the 2nd fastest growing type of crop.
Players can protect their allotments from disease by paying nearby farmers with the appropriate payment for each separate patch, or through having the corresponding flower fully grown in the nearby patch; flowers that protect allotments are specific to the seed planted, though the white lily protects all crop types in an allotment patch.
The required Farming levels and growth timings vary depending on the seed. Here is a list of commonly used seeds for allotments, along with their required Farming levels, growth times and total experience:
Potato seed

Farming level required: 1
Growth time: 4x 10 mins (40 minutes)
Protection: Marigold or White lily (Flower) / 2x Compost (Farmer)
Total experience: 340
Onion seed
Farming level required: 5
Growth time: 4x 10 mins (40 minutes)
Protection: Marigold or White lily (Flower) / 1x Potatoes (10) (Farmer)
Total experience: 400
Cabbage seed
Farming level required: 7
Growth time: 4x 10 mins (40 minutes)
Protection: Rosemary or White lily (Flower) / 1x Onions (10) (Farmer)
Total experience: 430
Tomato seed
Farming level required: 12
Growth time: 4x 10 mins (40 minutes)
Protection: Marigold or White lily (Flower) / 2x Cabbages (10) (Farmer)
Total experience: 530
Sweetcorn seed
Farming level required: 20
Growth time: 6x 10 mins (60 minutes)
Protection: Scarecrow or White lily (Flower) / 10x Jute Fibre (Farmer)
Total experience: 720
Strawberry seed
Farming level required: 31
Growth time: 6x 10 mins (60 minutes)
Protection: White lily (Flower) / 1x Apples basket (5) (Farmer)
Total experience: 1100
Watermelon seed
Farming level required: 47
Growth time: 8x 10 mins (80 minutes)
Protection: Nasturtiums or White lily (Flower) / 10x Curry Leaf (Farmer)
Total experience: 2060
Snape grass seed
Farming level required: 61
Growth time: 7x 10 mins (70 minutes)
Protection: White lily (Flower) / 5x Jangerberries (Farmer)
Total experience: 3280Note: Total experience gained from each seed when fully grown
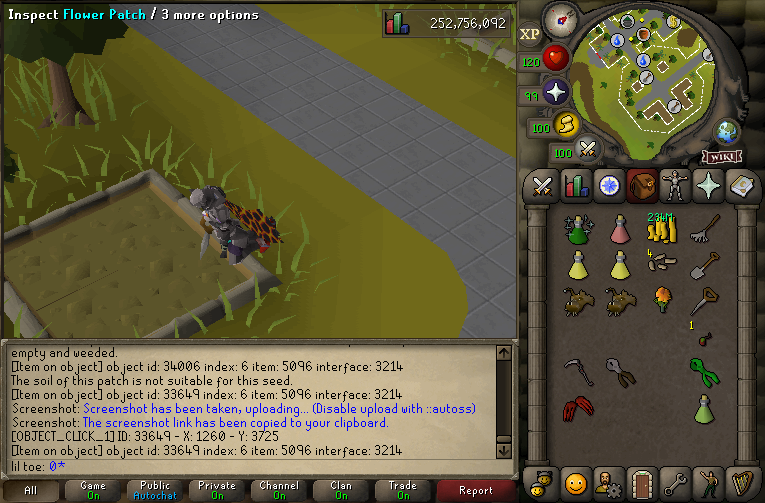
Flower patch
Flower patches are usually found alongside allotment patches. A single flower seed is needed to plant in a flower patch; a fully grown flower protects specific allotment crops depending upon the flower's type.
Here's a list of commonly used seeds for flower patches, along with their required Farming levels, growth times, and total experience gained when fully grown:
Marigold seed

Farming level required: 2
Growth time: 4x 5 mins (20 minutes)
Total experience: 1110
Rosemary seed
Farming level required: 11
Growth time: 4x 5 mins (20 minutes)
Total experience: 1570
Nasturtium seed
Farming level required: 24
Growth time: 4x 5 mins (20 minutes)
Total experience: 2610
Woad seed
Farming level required: 25
Growth time: 4x 5 mins (20 minutes)
Total experience: 2720
Limpwurt seed
Farming level required: 26
Growth time: 4x 5 mins (20 minutes)
Total experience: 2830
White lily seed
Farming level required: 58
Growth time: 4x 5 mins (20 minutes)
Total experience: 5830Note: White lily protects all neighbouring allotments from disease.
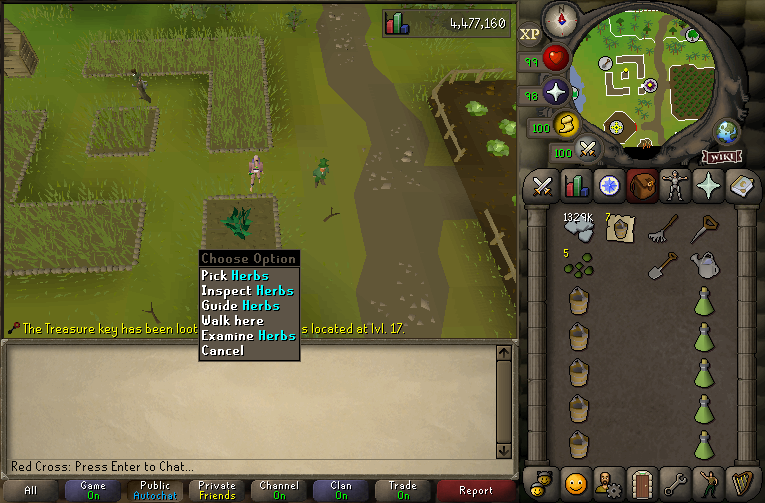
Herb patch
Herb patches are Farming patches in which players can grow herbs. All herbs take approximately 80 minutes to grow before you can harvest them. Each patch requires one seed to begin growing that herb type. You need a seed dibber to plant a herb, and a spade to harvest herbs.
Here's a list of commonly used seeds for herb patches, along with their required Farming levels, growth times, and total experience gained when fully grown:
Guam seed

Farming level required: 9
Growth time: 4x 20 mins (80 minutes)
Total experience: 1970
Marrentill seed
Farming level required: 14
Growth time: 4x 20 mins (80 minutes)
Total experience: 2370
Tarromin seed
Farming level required: 19
Growth time: 4x 20 mins (80 minutes)
Total experience: 2840
Harralander seed
Farming level required: 26
Growth time: 4x 20 mins (80 minutes)
Total experience: 3790
Ranarr seed
Farming level required: 32
Growth time: 4x 20 mins (80 minutes)
Total experience: 4810
Toadflax seed
Farming level required: 38
Growth time: 4x 20 mins (80 minutes)
Total experience: 6070
Irit seed
Farming level required: 44
Growth time: 4x 20 mins (80 minutes)
Total experience: 7650
Avantoe seed
Farming level required: 50
Growth time: 4x 20 mins (80 minutes)
Total experience: 9700
Kwuarm seed
Farming level required: 56
Growth time: 4x 20 mins (80 minutes)
Total experience: 12,300
Snapdragon seed
Farming level required: 62
Growth time: 4x 20 mins (80 minutes)
Total experience: 15,540
Cadantine seed
Farming level required: 67
Growth time: 4x 20 mins (80 minutes)
Total experience: 18,930
Lantadyme seed
Farming level required: 73
Growth time: 4x 20 mins (80 minutes)
Total experience: 23,900
Dwarf weed seed
Farming level required: 79
Growth time: 4x 20 mins (80 minutes)
Total experience: 30,290
Torstol seed
Farming level required: 85
Growth time: 4x 20 mins (80 minutes)
Total experience: 35,420Bush patch
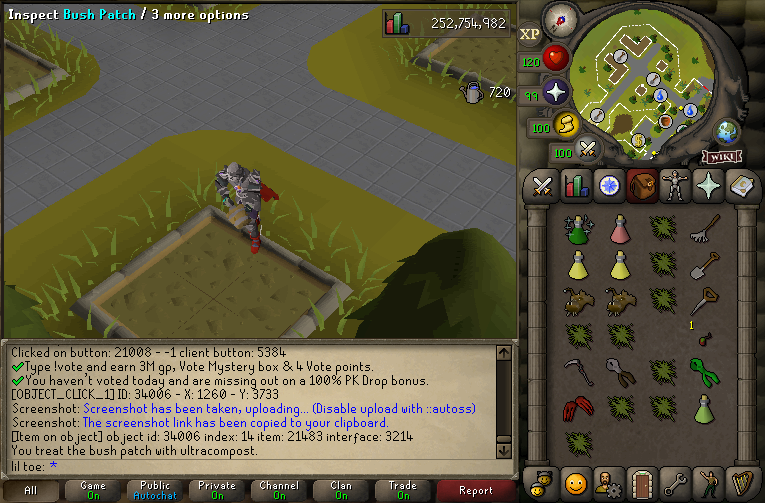
Bush patches are a Farming patch in which players can grow bushes that yield berries. Planting a bush requires using one bush seed on any patch. To remove a bush, use a spade on it to dig it up after harvesting.
Here's a list of commonly used seeds for bush patches, along with their required Farming levels, growth times, and total experience gained when fully grown:
Redberry seed

Farming level required: 10
Growth time: 5x 20 mins (100 minutes)
Protection: 4x Cabbages sack (10) (Farmer)
Total experience: 1600
Cadavaberry seed
Farming level required: 22
Growth time: 6x 20 mins (120 minutes)
Protection: 3x Tomatos basket (5) (Farmer)
Total experience: 2550
Dwellberry seed
Farming level required: 36
Growth time: 7x 20 mins (140 minutes)
Protection: 3x Strawberries basket (5) (Farmer)
Total experience: 4420
Jangerberry seed
Farming level required: 48
Growth time: 8x 20 mins (160 minutes)
Protection: 6x Watermelons (Farmer)
Total experience: 7080
Whiteberry seed
Farming level required: 59
Growth time: 8x 20 mins (160 minutes)
Protection: 8x Bittercap mushroom (Farmer)
Total experience: 10,890
Poison ivy seed
Farming level required: 70
Growth time: 8x 20 mins (160 minutes)
Protection: Immune to disease
Total experience: 16,800Tree patch
Players can grow trees by using a seed on a plant pot filled with soil to create a seedling. The seedling then needs to be watered. The seedling will turn into a sapling, which can then be planted in a tree patch.
Players must have a spade in their inventory when planting and removing the stump of a tree.
Here's a list of commonly used tree seeds for tree patches, along with their required Farming levels, growth times, and total experience gained when fully grown:
Oak sapling (Acorn seed)

Farming level required: 15
Growth time: 5x 40 mins (200 minutes)
Protection: 1x Tomatoes basket (5) (Farmer)
Total experience: 9626
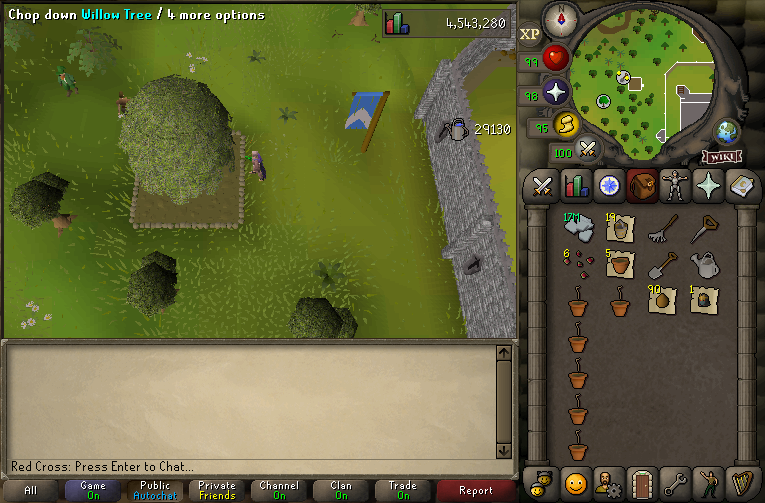
Willow sapling (Willow seed)
Farming level required: 30
Growth time: 6x 40 mins (240 minutes -> 4h)
Protection: 1x Apples basket (5) (Farmer)
Total experience: 29,630
Maple sapling (Maple seed)
Farming level required: 45
Growth time: 8x 40 mins (320minutes)
Protection: 1x Oranges basket (5) (Farmer)
Total experience: 68,968
Yew sapling (Yew seed)
Farming level required: 60
Growth time: 10x 40 mins (400 minutes)
Protection: 10x Cactus Spine (Farmer)
Total experience: 143,018
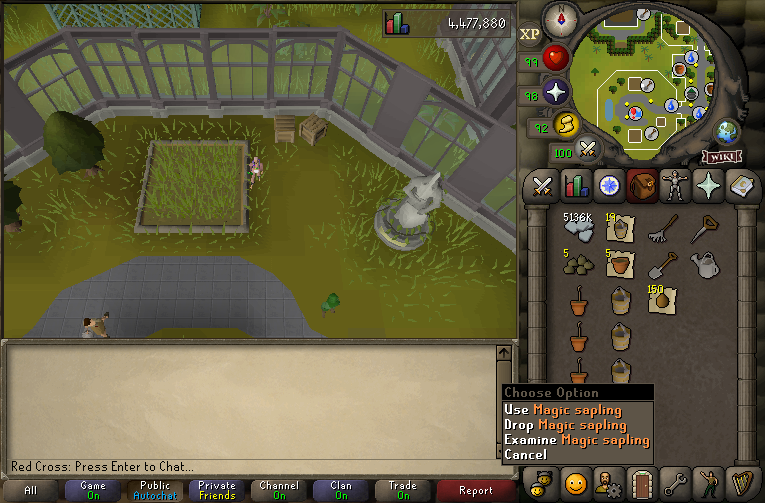
Magic sapling (Magic seed)
Farming level required: 75
Growth time: 12x 40 mins (480 minutes -> 8h)
Protection: 25x Coconut (Farmer)
Total experience: 278,276Fruit tree patch
Players can grow fruit trees by using a fruit tree seed on a plant pot filled with soil to create a seedling. The seedling then needs to be watered. The seedling will turn into a sapling, which can then be planted in a fruit tree patch.
Players must have a spade in their inventory when planting and removing the stump of a fruit tree.
Here's a list of commonly used fruit tree seeds for fruit tree patches, along with their required Farming levels, growth times, and total experience gained when fully grown:
Apple tree sapling (Apple Seed)

Farming level required: 27
Growth time: 6x 160 mins (960 minutes ->16h)
Protection: 9x Sweetcorn (Farmer)
Total experience: 25,450
Banana tree sapling (Banana Seed)
Farming level required: 33
Growth time: 6x 160 mins (960 minutes ->16h)
Protection: 4x Apples basket (5) (Farmer)
Total experience: 36,830
Orange tree sapling (Orange Seed)
Farming level required: 39
Growth time: 6x 160 mins (960 minutes ->16h)
Protection: 3x Strawberries basket (5) (Farmer)
Total experience: 51,734
Curry tree sapling (Curry Seed)
Farming level required: 42
Growth time: 6x 160 mins (960 minutes ->16h)
Protection: 5x Bananas basket (5) (Farmer)
Total experience: 60,738
Pineapple tree sapling (Pineapple Seed)
Farming level required: 51
Growth time: 6x 160 mins (960 minutes ->16h)
Protection: 10x Watermelon (Farmer)
Total experience: 95,834
Papaya tree sapling (Papaya Seed)
Farming level required: 57
Growth time: 6x 160 mins (960 minutes ->16h)
Protection: 10x Pineapple (Farmer)
Total experience: 127,608
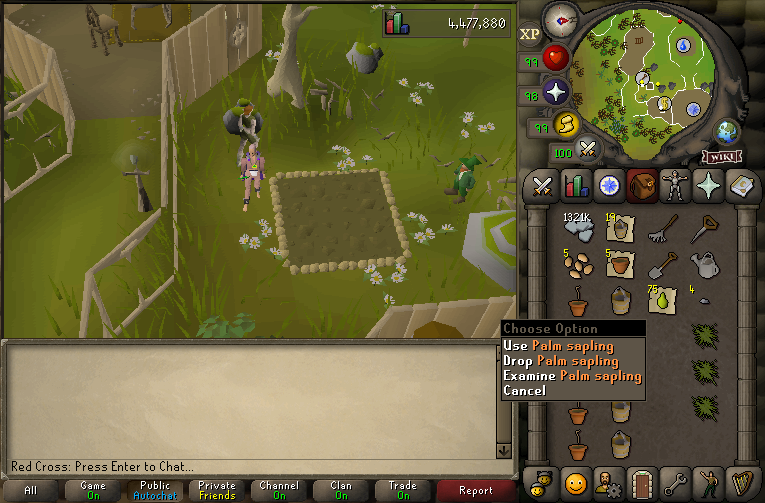
Palm tree sapling (Palm tree Seed)
Farming level required: 68
Growth time: 6x 160 mins (960 minutes ->16h)
Protection: 15x Papaya Fruit (Farmer)
Total experience: 210,192
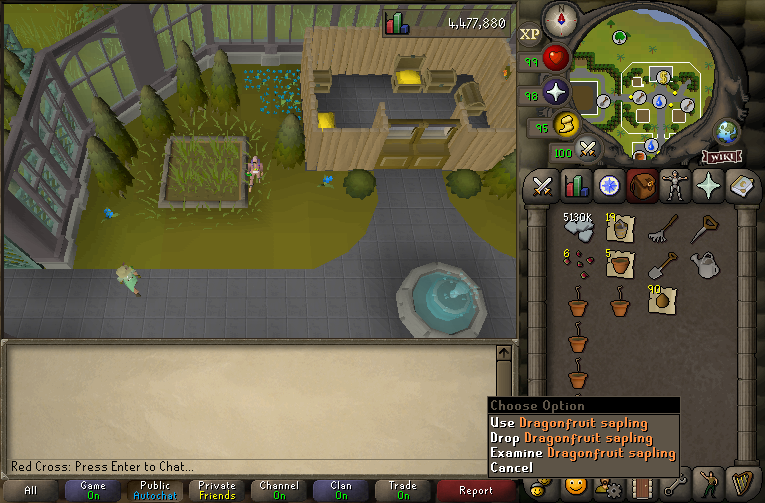
Dragonfruit tree sapling (Dragonfruit Seed)
Farming level required: 81
Growth time: 6x 160 mins (960 minutes ->16h)
Protection: 15x Coconut (Farmer)
Total experience: 357,900Special patches
Some plants may only be grown in their specific patches. Many varieties of unique farming patches exist exclusively for growing very specific plants. Most often, only a single type of seed can be planted in these patches; though some, such as the Anima patch, have a few seeds available.
The mechanics of each specific patch may also be different than similar patches more familiar to the player.
Here's a list of commonly used special tree seeds for special tree patches, along with their required Farming levels, growth times, and total experience gained when fully grown:
Cactus sapling (Cactus seed) - Cacti seeds

Farming level required: 55
Growth time: 7x 80 mins (560 minutes)
Protection: 6x Cadava Berries (Farmer)
Total experience: 9310Potato cactus sapling (Potato cactus seed) - Cacti seeds

Farming level required: 64
Growth time: 7x 10 mins (70 minutes)
Protection: 8x Snape Grass (Farmer)
Total experience: 7320Calquat sapling (Calquat tree Seed) - Special Tree seeds

Farming level required: 72
Growth time: 8x 160 mins (1280 minutes)
Protection: 8x Poison Ivy Berries (Farmer)
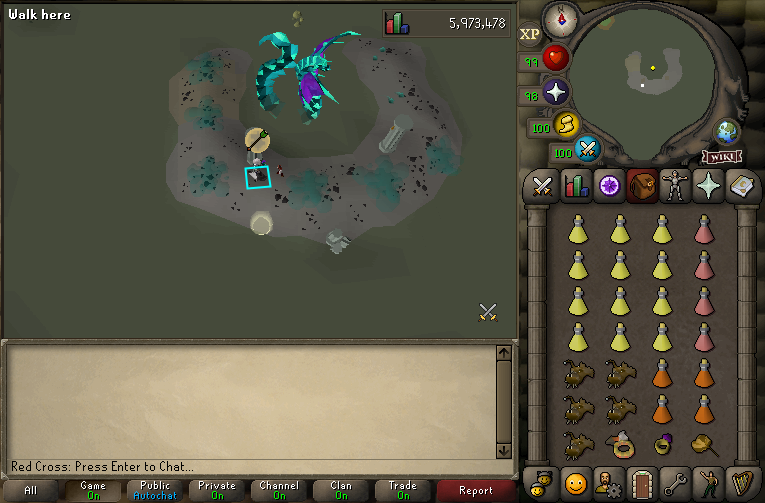
Total experience: 245,480Crystal tree sapling (Crystal acorns) - Special Tree seeds

Farming level required: 74
Growth time: 6x 80 mins (480 minutes)
Protection: Immune
Total experience: 267,320Attas seed - Anima seeds

Farming level required: 76
Growth time: 8x 640 minutes -> 85h20m
Protection: Immune
Total experience: 2000
Effect: The Attas plant will increase the yield of the player's farming patches for approximately 3.5 days.
Iasor seed - Anima seeds
Farming level required: 76
Growth time: 8x 640 minutes -> 85h20m
Protection: Immune
Total experience: 2000
Effect: Decreases the chance of farming patches becoming diseased during growth by 80%, for approximately 3.5 days
Kronos seed - Anima seeds
Farming level required: 76
Growth time: 8x 640 minutes -> 85h20m
Protection: Immune
Total experience: 2000
Effect: Kronos plant provides a chance for Farming patches to skip a growth stage during their next growth cycle.Teak tree sapling - Hardwood Tree

Farming level required: 35
Growth time: 7x 640 minutes -> 64h
Protection: 15x Limpwurt root (Farmer)
Total experience: 146,500
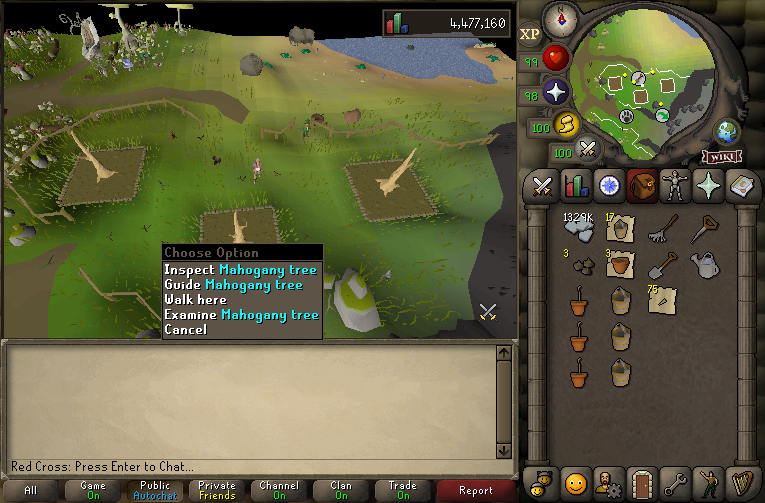
Mahogany tree sapling - Hardwood Tree
Farming level required: 55
Growth time: 8x 640 minutes -> 85h20m
Protection: 25x Cactus spine (Farmer)
Total experience: 315,660Hespori seed - Special seeds

Farming level required: 65
Growth time: 3x 640 minutes (32h)
Protection: Immune
Total experience: 252,000Note: Please note that these growth times and experience values are approximate and can vary depending on factors such as the use of compost or supercompost, as well as the use of magic secateurs or other equipment that may affect plant growth. Anima seeds are obtained exclusively from the Hespori droptable. Crystal acorns are obtainable from killing monsters in the Iorwerth dungeon
Farming level 1-99 (Spawn account)
SpoilerFarming is a considerably lengthy skill to train due to the long waiting times for plants to grow. This section of the guide will focus on how to get level 99 Farming. This is by no means the fastest amount of experience you’ll get, meanwhile it consists of mostly Tree runs with close to no effort.
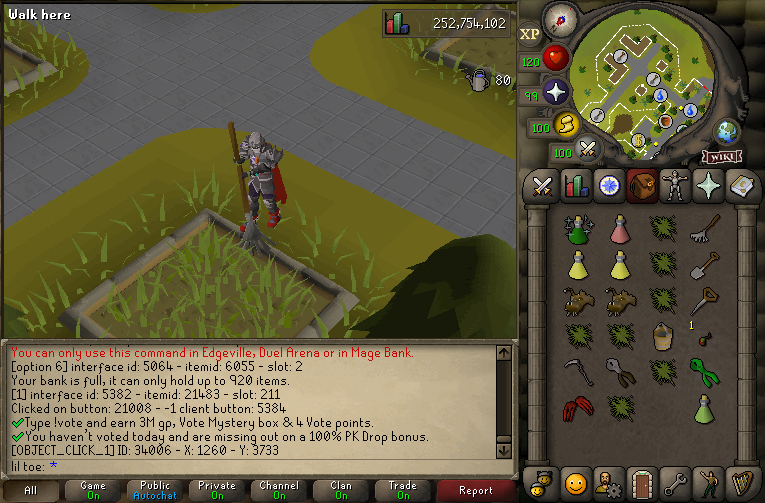
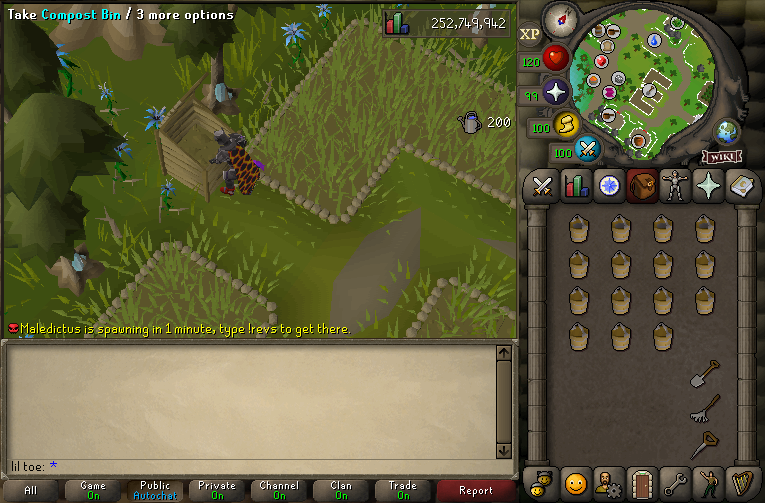
- Start by making Ultracompost on the Big Compost Bin located on the east wing of the Farming Guild. This process will take 90 minutes and yield 6000 xp. Requirements: 30 Pineaple, 50 volcanic ash, 30 buckets.
- Proceed by using a rake + ultracompost on each one of the 10 patches in which you can plant Trees and Fruit trees (This will grant you lvl 31 Farming).

Tree patch locations
Fruit tree patch locations
- Use the rake on the 5 Tree patches again and plant a Willow sapling on each patch (Search above how to create a Willow sapling). You’ll need an Apple basket (5) to protect each patch (This will grant you level 33 Farming).
- Use the rake on the 5 Fruit Tree patches again and plant a Banana sapling on each patch (Search above how to create a Banana sapling). You’ll need 4x Apple basket (5) to protect each patch (This will grant you level 35 Farming). Note: Fruit trees take 16h to grow.
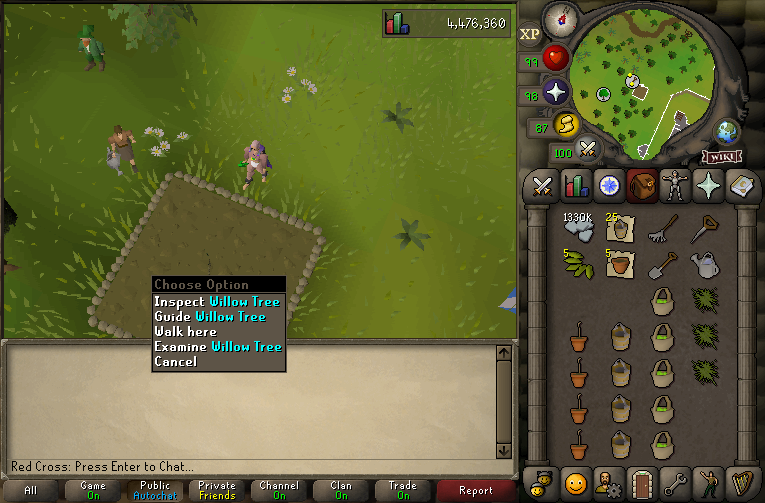
- Wait 4h for the Willow trees to grow. You can use Geomancy to track their process. After they’re fully grown, proceed by going to each one of the Tree patches and click ‘Check-health’. This will grant you level 55 Farming.
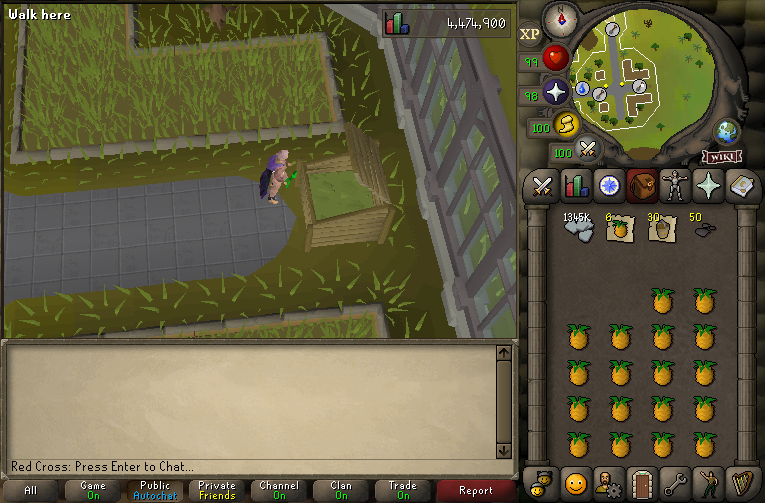
- Head now to Fossil Island (Tree spirit at ::home) and plant a Mahogany sapling on each one of the Hardwood patches (3x Mahogany saplings required). Use ultracompost on every patch and protect it with 25x Cactus spine. Mahogany is the best Hardwood tree you can possibly plant, meaning you’ll keep planting them until you reach level 99. Each tree will grant you 315,660 xp, despite taking roughly 85 hours to grow.
- In order to reach level 60 Farming (required to plant Yew saplings) proceed by planting an Avantoe seed on each one of the 5 Herb patches available. Use ultracompost on every herb patch and follow them closely (using geomancy) since herbs can get diseased quite easily. Avantoe patches take 80 minutes to grow.
- After 80 minutes have passed, harvest their crops and apply ultracompost to every herb patch again. Proceed by planting a Kwuarm seed on each one of the 5 Herb patches available. Kwuarm patches take 80 minutes to grow. After harvesting their crops, you will achieve a farming level of 60.
- Plant a Yew sapling on each one of the Tree patches (5x Yew saplings required). Use ultracompost on all the patches. You’ll need 10 cactus spine to protect each patch (50 cactus spine required). Yew trees take 6 hours and 40 minutes to grow.
- After the Yew trees are fully grown, proceed by going to each one of the Tree patches and click ‘Check-health’. This will grant you level 73 Farming.
- Plant a calquat sapling on the calquat patch located in Tai bwo wannai (You can purchase a teleport tablet by speaking with Captain Errdo located southwest of ::home). You’ll need 8 Poison Ivy Berries to protect this patch. Calquat saplings yield a total xp of 245,480, despite taking roughly 21 hours to grow. Since there’s only one calquat seed, you’ll keep planting it until you reach level 99.
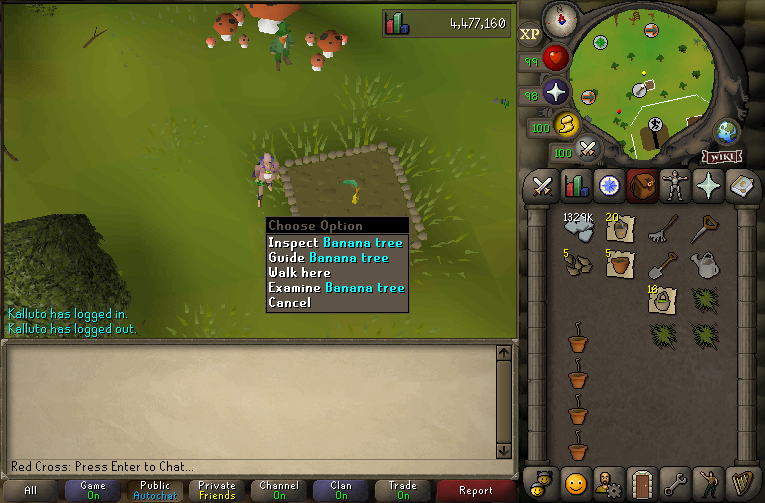
- Wait for Banana Tress to be ready (16 hours growth timer) After they’re fully grown, proceed by going to each one of the Fruit Tree patches and click ‘Check-health’. This will grant you a Farming level of 74.
- Plant a Palm sapling on each one of the Fruit Tree patches (5x Palm saplings required). You’ll need 15 Papaya to protect each patch (75 Papayas required). Use ultracompost on all the patches. Palm trees take 16h to grow.
- You should have now reached a Farming level of 75. From now on, you should only plant Magic saplings as for Tree patches. You’ll need 25 coconuts to protect each patch. You can plant trees on the Farming guild patch above level 65 farming.
- From level 81 onwards, plant Dragonfruit trees on every Fruit Tree Patch. You’ll need 15 coconuts to protect each patch. You can plant Fruit trees on the Farming guild patch above level 85 farming.
Additionally, you are able to plant Hespori seeds (Level 65+), Crystal saplings (Level 74+) and Anima seeds (Level 76+).
0 -
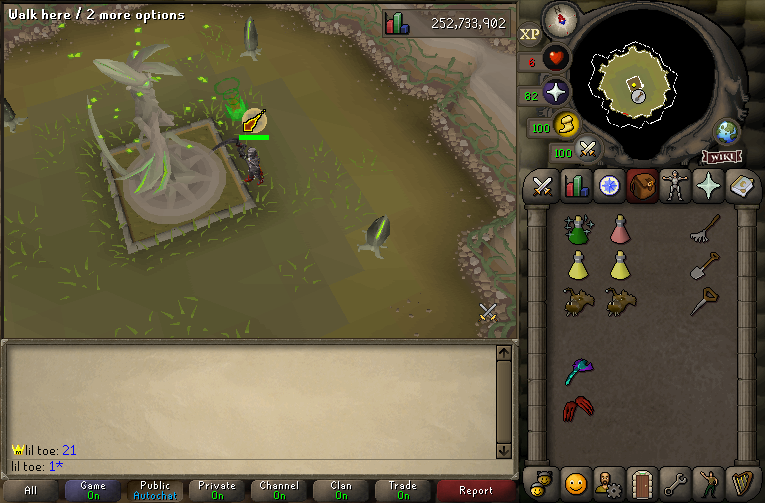
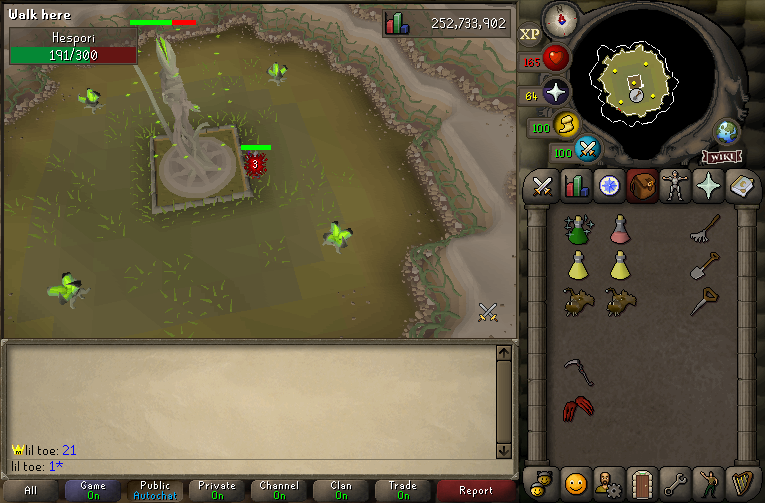
Hespori
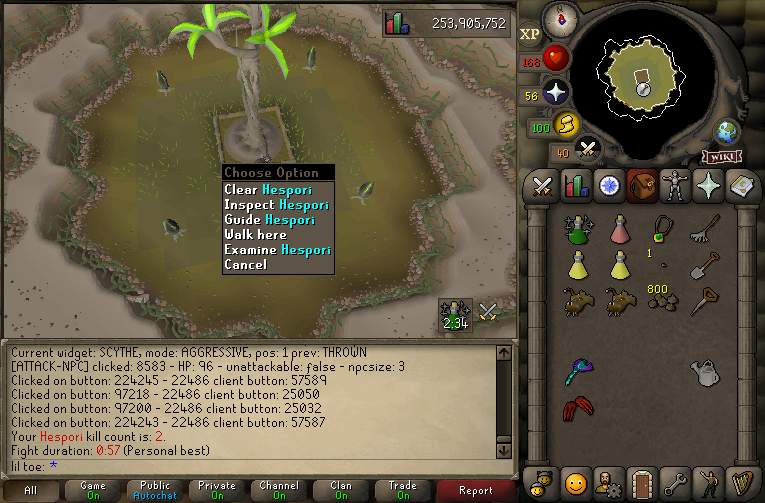
The Hespori is a sporadic boss. To fight it, players must first plant a Hespori seed in the Hespori patch within the west wing of the Farming Guild, which requires level 65 Farming to access. It takes 32 hours to grow, depending on when it was planted. When fully grown, the flower behind the cave entrance will sprout open. There is 1/18 chance of receiving an Hespori seed from checking health of tree type patches. 1/128 on allotment's last harvest.

Killing the Hespori allows it to be harvested, which grants 252,000 Farming experience
Note: An Hespori seed, rake, seed dibber and spade will be required.
Mechanics
Hespori has two main attacks:
A basic ranged attack that hits twice, both can hit 8 for a max of 16, which resemble like Hespori is throwing green spores.
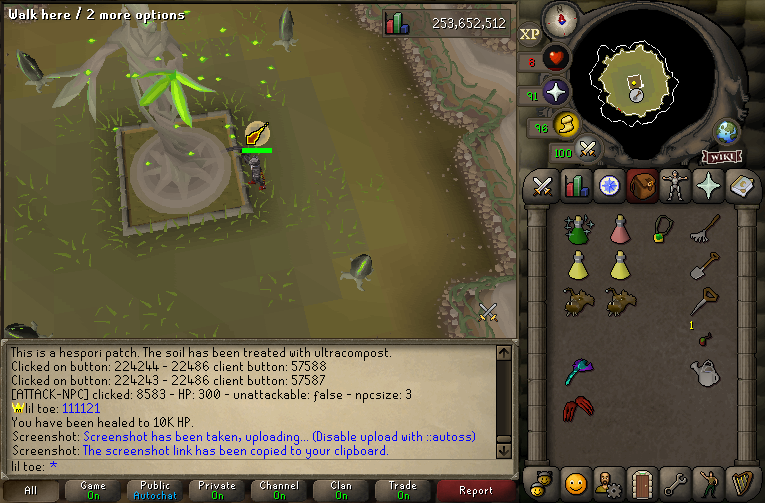
A basic magic attack that hits up to 14 and looks like an Earth Wave.
Four flower buds surround the Hespori. They open up three times during the fight: once at the start, then after Hespori goes below 66% of its health, and a last time once it goes below 33%. They have 10 hitpoints but will always die in one hit from any weapon. The Hespori is immune to damage while any flowers are open, and it will continue to attack while they are open.
SetupHespori has low slash defence, hence making scythe a good primary weapon to use. Special attack weapons such as dragon claws are recommended (dds and crystal halberd according to the money you dispose).
Bring a ranged weapon, such as a blowpipe or darts, to quickly kill Hespori's flowers.
A hespori seed, spade and seed dibber are required to plant a new Hespori after the previous Hespori has been defeated and dug up.
Bis equipment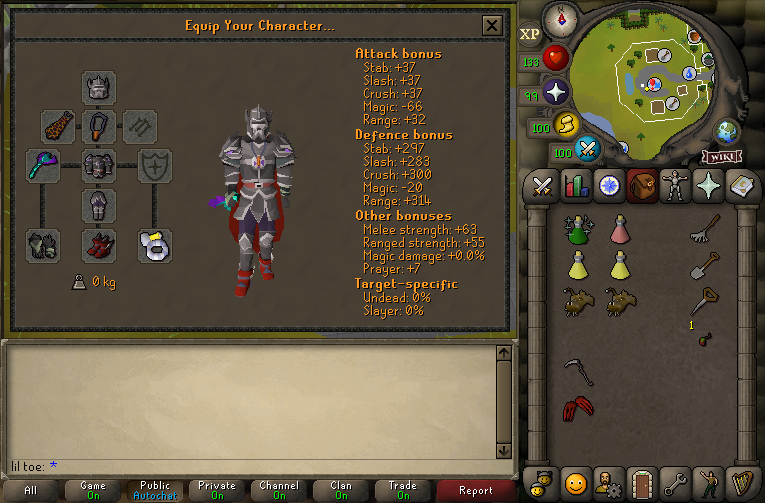
Welfare setup example

Note: Upgrades can be made according to the money you dispose
StrategyWake up Hespori and attack the first round of flowers with range (Blowpipe or darts). Swap to a special attack weapon and use the special attacks on Hespori (Claws, dds or crystal halberd). Switch back to the main slash weapon if the next round of flowers were not activated. Kill the flowers with range.
Attack Hespori until the flowers are active again. Switch to range and kill them. Finish off Hespori and clear the patch (in osrs wiki).
Note: With high ranged defence armour, Protect from Magic is recommended.
0 -
Getting Started
Start by using a rake on the weeds from one of the many farming patches found scattered around Runewild.
Once cleared, players have the option of applying compost to the patch, which will decrease the chance of the crop becoming diseased and will also possibly increase the yield of the crop once it reaches maturity.
Plant a seed/sapling on the farming patch and wait for it to grow. Each crop type has a predetermined probability of becoming diseased. Treating a farming patch with compost, supercompost or ultracompost before (or immediately after) planting a crop reduces the chance of disease (compost by 50%, supercompost by 80%, and ultracompost by 90%).
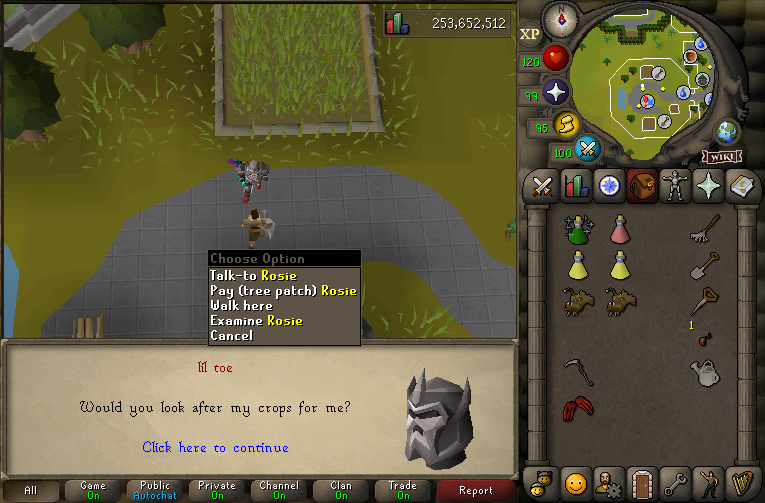
Allotment, Bush, Tree, Fruit tree and some special farming patches allow you to eliminate disease risk entirely (thus guaranteeing a 100% success rate) by paying one of the farmers near the farming patch to watch over it and ensure that it grows to completion. The price depends on the crop the player asks them to watch.
Players can view the status of every single farming patch through an interface which displays information regarding: the Crop type, Growth stage, Patch protection status, Patch compost status, Patch water status and Available yield. This interface can be accessed by casting the Geomancy spell (from Lunar’s spellbook) by interacting with the Nature Spirit (Located in the Farming Guild) or by using an Amulet of nature (You can purchase it from Allanna's Store).

After growing for a preset period of time crops will mature and can then be harvested. Additionally, you should always pay the farmer to chop down the trees, as it is significantly faster than chopping yourself and the fee is very minimal (20,000 coins).
0 -
Making Compost & Why
Compost is used to reduce the chance of a farming patch becoming diseased. This topic will clarify the process to create compost, supercompost and ultracompost.
Compost
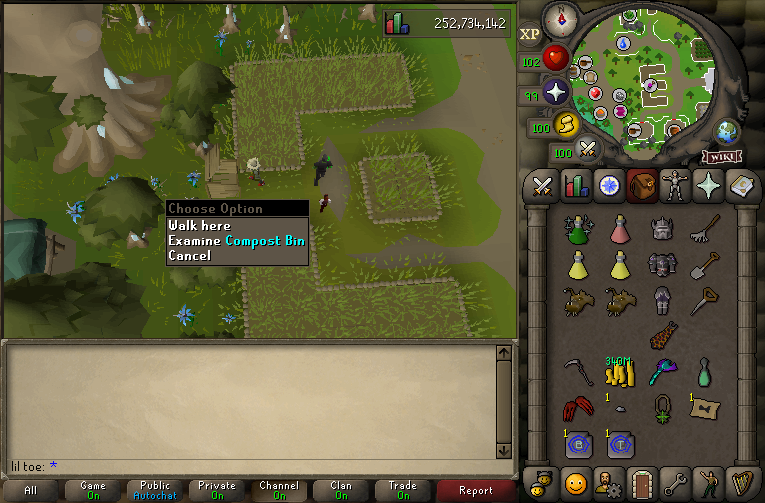
Compost is used to reduce the chance of a farming patch becoming diseased per growth stage by 50%. When used on a farming patch, each bucket grants 360 Farming experience. It also increases the minimum yield and maximum number of harvests received from allotments and herb patches.

Compost can be made at farming patches by putting 15 items (including weeds and other farming produce - Redberries are recommended) into a compost bin. It takes 30 minutes after a compost bin is closed for the vegetation to become 15 buckets worth of compost (90 minutes if using a big compost bin –> big compost bins require to be filled with 30 items instead of 15). Filling a bucket with compost gives 90 Farming experience and collecting all of the compost from a full compost bin yields 1350 Farming experience.
Note: Compost can be bought from Allana’s shop at the Farming guild.
Supercompost
Supercompost is a superior version of compost. The process to create supercompost is similar to the one used to create compost, use 15 Pineapple instead of Redberries on the compost bin (cheapest option).

Players may also use a compost potion
 (Harralander potion (unf) + Volcanic ash) to create supercompost. One dose of compost potion will change an entire finished bin of compost into supercompost, or one bucket of compost that has already been collected.
Ultracompost
Ultracompost is the most potent version of compost, used in the Farming skill to greatly reduce the chance of a farming patch from becoming diseased per growth stage by 90% (compared to 50% for compost and 85% for supercompost). When used on a farming patch, each bucket grants 720 Farming experience.

To make ultracompost, players must use two volcanic ash on a bucket of supercompost. To make it in a compost bin, players must add 25 volcanic ash to a compost bin (50 on a Big Compost Bin) containing supercompost, and then collect it using buckets.
Bottomless compost
A bottomless compost bucket is a drop from the Hespori, which can be filled with compost, supercompost, or ultracompost.

The bottomless bucket can hold a maximum of 10,000 uses of a single type of compost. With each bucket of compost added, it gains two charges, effectively doubling the use of a single bucket of compost. It can be filled from a compost bin or from other noted or unnoted buckets of compost.
Compost bin locations
Compost Bin located Northeast of Prifddinas (Spiritual tree -> Cities -> Prifddinas)
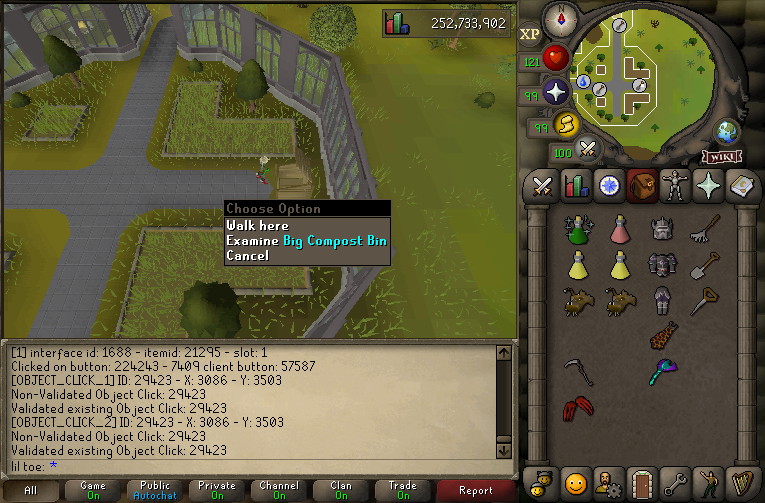
Big Compost Bin located East of the Farming Guild (Spiritual tree -> Skilling-> Farming Guild)
Click here to check the location of other compost bins across Runewild
TL;DR - Making Ultracompost (Compost Bin)
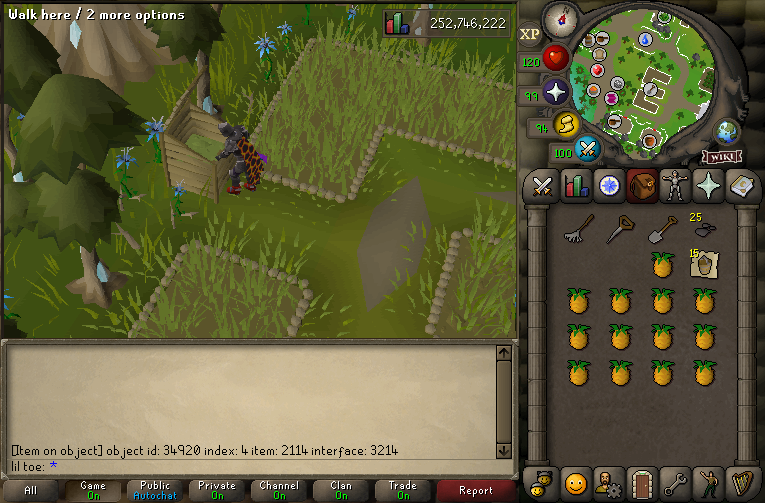
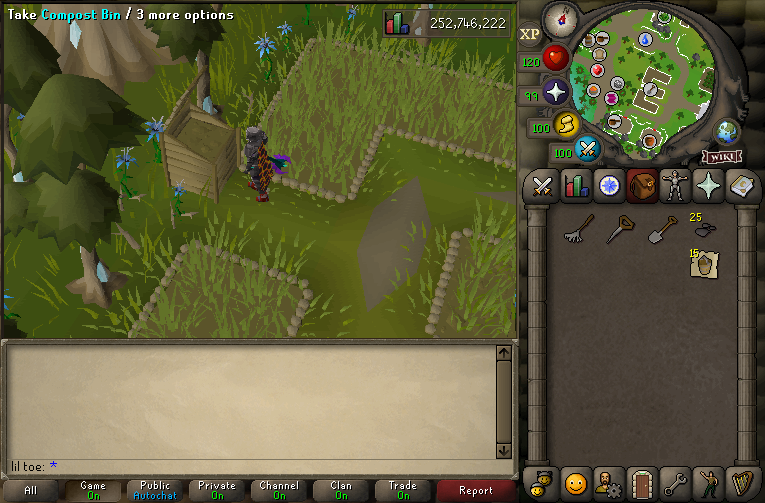
Use 15x Pineapple on the Compost Bin (You can purchase them from Allanna's Store).
Once the bin is full, the lid of the compost bin must be closed to allow the contents to rot. This process takes approximately 30 minutes until completion, after which the player may open the compost bin.
Add 25x volcanic ash to the Compost Bin (You can purchase them from Allanna's Store).
Collect the Ultracompost using 15x buckets (You can purchase them from Allanna's Store) or use a Bottomless bucket.
 1
1 -
Farming Equipment (Tools)
For farming, there are certain tools you will need to use. Depending on your chosen farming methods, you will need all or at least some of these items:
 Rake - Used to remove weeds from farming patches.
 Seed Dibber - Used to plant seeds in farming patches.
 Spade - Used for harvesting crops, clearing away dead plants and removing plant roots and bushes.
 Secateurs - Used to prune diseased leaves from trees or bushes.
 Magic secateurs - Increase the chance of additional crop yield beyond the minimum number by 10%
 Gardening trowel - Used to fill plant pots with soil, as well as planting tree seeds in plant pots to grow saplings.
 Filled Plant pot - Used along with a trowel to plant tree seeds, which, when watered, produce tree saplings.
 Watering cans - Used to water allotment, flower, and hops patches. Also used to water tree seedlings. Holds up to 8 charges.
 Gricoller's can - Acts as a watering can, difference being that it holds 1,000 charges. Use it on the Fountain located in the Farming Guild to fill it.
 Plant cure - Cures a diseased plant (other than trees and bushes).
 Basket - Used to store up to 5 pieces of fruit (Tomatoes, Strawberries, Oranges, Apples, Bananas).
 Empty sack - Used to store up to 10 vegetables (Potatoes, Cabbages, Onions).
Compost - Used to reduce the chance of a farming patch becoming diseased.
Empty sack - Used to store up to 10 vegetables (Potatoes, Cabbages, Onions).
Compost - Used to reduce the chance of a farming patch becoming diseased.
 Hespori seed - Can only be planted in the Hespori patch (required in order to fight Hespori).
Note: You can buy these farming tools from Allana's farming shop located in the Farming Guild.
All of the Lunar Spellbook utility spells are functional (Cure Plant, Humidify, Fertile Soil, Geomancy).
0 -
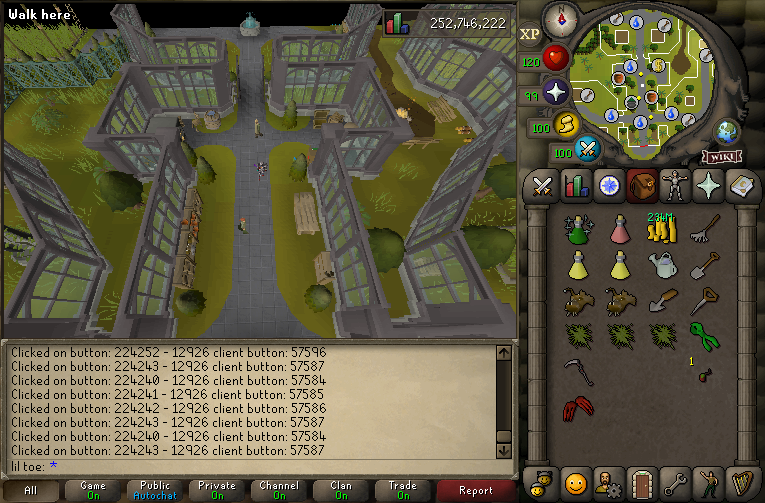
Location
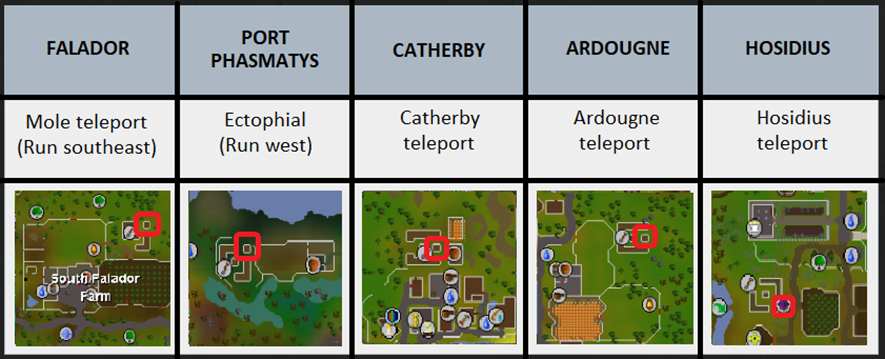
You can teleport to the Farming Guild by using the Spiritual fairy tree located at ::home, choosing the option: Skilling - Farming Guild
Tree Patches

Fruit Tree Patches
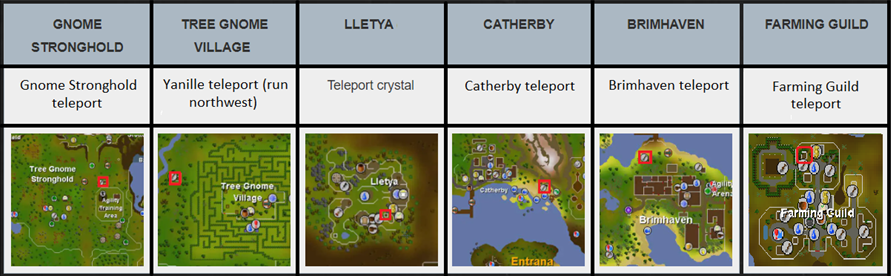
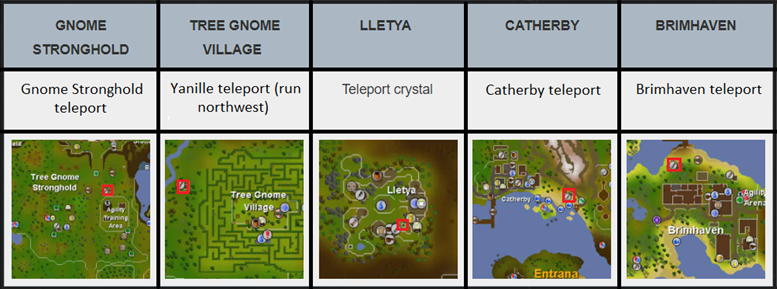
Note: Captain Errdo located near the Spiritual tree (at ::home) allows you to purchase: Magic tablets, Xeric's talisman, Tai bwo wannai teleports, Teleport crystal and Ectophial, which will get you to your destination faster. You can also purchase an Explorer's ring 4 and an Ardougne Cloak 4 through the Vote points store.
0 -
This guide contains detailed information regarding the skill Farming, including its location, a list of methods and their requirements, amongst others
Note: If you have a correction for this guide or a suggestion regarding additional information, please leave a message on the comment section.

Farming is a skill in which players plant seeds and harvest crops. The plants grown in farming patches are accessible only to the player who grew them. Planted crops grow according to set timings, continuing even after a player logs out. This makes it possible to gain large amounts of experience from little in-game time, especially when growing high-experience crops such as trees.
There are various ways of leveling up this Skill efficiently. This Guide will go over the fastest and the most efficient alternative methods of leveling up Farming from 1 to 99.
Navigation:
2 -
Alod good mano. Thanks to him I can now run toa with 700 invocation
1 -
4 hours ago, Blue Pepega said:Great guide, looks nice, clean and updated.
One thing i have with it is the underselling of the pkp items, since you effectively value pkp at 2-2,5k. I disagree with the lower pricing of those items from the shop (Dihns, Claws, Acb). It is true that they have other sources, but i think they should still to some extend be tied to that pricing. Same goes for ags being less than 100m imo, doesn't sit right with me.
Another i feel like should be added, is a symbol or something, in relation to shop prices of such items. This is to show they can actually be sold for that amount and also to establish a minimum value in the event of a trade with another player.
Slightly increased the max value on the estimate prince range for most of the weapons that can also be obtained through pkp points (Dinh's, claws, ags, acb). Decreased the price a bit on some of the other items to match the average of 1.8-2k per pkp (current price on tp rn). As for the Miscellaneous items, added an extra value (in blue) equivalent to the price that Vannaka will automatically buy these items for. Thanks for the feedback
 1
1 -
This guide contains an estimate of the current prices on most of the items which are listed on the Trade Post.
Note: All prices listed are subject to change at any moment due to future content, constant changing of prices through the Trading Post, etc. so please do not rely solely on this thread for reference. This guide follows the same format as Hp's.
Hold "CTRL + F" then type the item you wish to search for
Each price range has a different colour:
Green = 1m - 100m
Orange = 100m - 1b
Red = 1b - 10b
Purple = 10b+
Note: Prices listed with a "+/-" next to them are constantly changing in value.

~ Donator Store Items ~
 Servant (Royal rank) - 24-28b +/-
 TokHaar-kal (Diamond rank) - 12.5-14b +/-
 Wise old man's santa hat - 150m-250m
 Mask of balance - 20-30m
 Woolly Hat - 15-20m
 Blackjack table - 3-4,5b +/-
 100 credits scroll (10$) - 850-950m +/-
 Yell tag scroll - 700-800m +/-
 Name change scroll - 110-130m +/-
 Membership bond (30 days) - 90-115m +/-
 Ultra mystery box - 200-230m +/-
 Pet box - 175-200m +/-
 Mystery box - 65-75m +/-
 Christmas cracker - 2-3b +/-
 Black partyhat - 1.5-2.5b +/-
 Black h'ween mask - 1.5-2b +/-
 Black santa hat - 1-2b +/-
 Santa hat - 500-600m +/-
 Sagacious spectacles - 500-600m +/-
 Fancy Strong Armour (1) Top - 1.5-2.5b +/-
 Fancy Strong Armour (1) Bottom - 1.5-2.5b +/-
 Fancy Strong Armour (2) Top - 3-4b +/-
 Fancy Strong Armour (2) Bottom - 3-4b +/-
~ Clue Scroll Rewards ~
 3rd age full helmet - 400-500m +/-
 3rd age platebody - 900m-1.1b +/-
 3rd age platelegs - 900m-1.1b +/-
 3rd age plateskirt - 900m-1.1b +/-
 3rd age kiteshield - 500-600m +/-
 3rd Age mage hat - 400-500m +/-
 3rd Age robe top - 900m-1.1b +/-
 3rd Age robe bottom - 900m-1.1b +/-
 3rd Age amulet - 400-500m +/-
 3rd Age range coif - 150-200m +/-
 3rd Age range top - 300-400m +/-
 3rd Age range legs - 300-400m +/-
 3rd Age vambraces - 200-300m +/-
 3rd Age Longsword - 400-500m +/-
 3rd Age Bow - 400-500m +/-
 3rd Age Wand - 300-400m +/-
 3rd Age Pickaxe - 900m-1.1b +/-
 3rd Age axe - 400-500m +/-
 3rd Age Cloak - 400-500m +/-
~ Corporeal Beast ~
 Elysian spirit shield - 78-84b +/-
 Arcane spirit shield - 2.6-2.9b +/-
 Spectral spirit shield - 60-80m +/-
 Blessed spirit shield - 1.5m
 Spirit shield - 700k
~ Chambers Of Xeric (Raids 1) ~
 Twisted bow - 3.8-4.2b +/-
 - Vesta's Platebody - 1.1-1.3b +/-
 - Vesta's Chainskirt - 1.1-1.3b +/-
 Statius's warhammer - 600-800m +/-
 Vesta's longsword - 600-800m +/-
 Elder maul - 500-600m +/-
 Kodai wand - 150-180m +/-
 Ancestral hat - 150m-200m +/-
 Ancestral robe top - 250m-350m
 Ancestral robe bottom - 250m-350m
 Prayer scroll - 200-250m +/-
 Dragon claws - 90-100m +/-
 Dragon thrownaxe - 120-150k
~ Theatre of Blood (Raids 2) ~
.png?5672e) Scythe of Vitur - 2.2-2.5b +/-
Scythe of Vitur - 2.2-2.5b +/-
 Sanguinesti Staff - 900m-1.1b +/-
 Avernic Defender - 1.1-1.3b +/-
 Ghrazi Rapier - 100-150m +/-
 Justiciar Faceguard - 25-40m +/-
 Justiciar Chestguard - 25-40m +/-
 Justiciar Legguards - 25-40m +/-
~ Tombs of Amascut (Raids 3) ~
 Tumeken's Shadow - 28-31b +/-
 Osmumten's Fang - 9b-10.5b +/-
 Masori Mask - 2.5-3.5b +/-
 Masori Body - 5-6.5b +/-
 Masori Chaps - 5-6.5b +/-
 Elidinis' Ward - 3.5-4.5b +/-
 Lightbearer - 2.5-3.5b +/-
~ Nightmare ~
 Volatile Orb - 5.5-6.5b +/-
 Harmonised Orb - 3-4b +/-
 Eldritch Orb - 500m-700m +/-
 Nightmare Staff - 1.1-1.3b +/-
 Inquisitor's Great Helm - 450-550m +/-
 Inquisitor's Hauberk - 450-550m +/-
 Inquisitor's Plateskirt - 450-550m +/-
 Inquisitor's Mace - 450-550m +/-
~ Nex ~
 Zaryte Crossbow - 13-14.5b +/-
 Torva Full Helm - 3.3-4b +/-
 Torva Platebody - 3.3-4b +/-
 Torva Platelegs - 3.3-4b +/-
 Ancient Godsword - 2-2.5b +/-
 Zaryte Vambraces - 1.2-1.6b +/-
~ Alchemical Hydra ~
 Dragon Hunter Lance - 1.5-2b +/-
 Ferocious Gloves - 1.5-1.8b +/-
 Brimstone Ring - 500-600m
 Boots of brimstone - 15-20m
~ Chaos Fanatic ~
 Ring of Vigour - 1.3-1.6b +/-
Kodai wand - 150-180m +/-
Ring of Vigour - 1.3-1.6b +/-
Kodai wand - 150-180m +/-
 Dragon Warhammer - 130-135m +/-
 Malediction ward - 3-4m
 Odium ward - 3-4m
~ Venenatis & Spindel ~
 Voidwaker - 20-22b +/-
 Voidwaker gem - 9b-10b +/-
 Fangs of venenatis - 200-300m +/-
 Webweaver bow - 200-300m +/-
Prayer scroll - 200-250m +/-
Webweaver bow - 200-300m +/-
Prayer scroll - 200-250m +/-
 Dragon pickaxe - 1-2m
~ Vetion & Calvarion ~
 Voidwaker blade - 8b-9b +/-
 Skull of vet'ion - 150-200m +/-
 Accursed sceptre - 150-200m +/-
 Blade of saeldor - 75m-150m +/-
~ Callisto & Artio ~
 Voidwaker hilt - 2b-3b +/-
 Claws of callisto - 150-250m +/-
 Ursine chainmace - 150-250m +/-
 Dinh's bulwark - 125-175m +/-
~ Vorkath ~
 Vorkath's head - 700-800m +/-
 Ava's assembler - 500-600m +/-
.png/revision/latest?cb=20180802151807) Dragonfire ward - 25-30m
Dragonfire ward - 25-30m
~ Malevolent Ghost ~
 Infernal cape - 1.3-1.6b +/-
 Twisted Buckler - 1.3-1.7b +/-
 Obsidian Platelegs - 10m
 Obsidian Platebody - 10m
 Obsidian Helmet - 2.5m
 Dragon hunter crossbow - 3m
 Dragon sword - 3m
~ Crystal Equipment ~
 Bow of faerdhinen - 900m-1.1b +/-
 Crystal legs - 400-550m +/-
 Crystal Body - 400-550m +/-
 Crystal helm - 150-250m +/-
~ Bounty Hunter Items ~
Vesta's platebody - 1.1-1.3b +/-
Vesta's chainskirt - 1.1-1.3b +/-
Vesta's longsword - 600-800m +/-
 Statius's full helm - 750-850m +/-
 Statius's platebody - 800-900m +/-
 Statius's platelegs - 800-900m +/-
Statius's warhammer - 600-800m +/-
Statius's platelegs - 800-900m +/-
Statius's warhammer - 600-800m +/-
 Zuriel's hood - 500-600m +/-
 Zuriel's robe top - 900m-1.1b +/-
 Zuriel's robe bottom - 900m-1.1b +/-
 Zuriel's staff - 200-300m +/-
 Morrigan's coif - 800m-1b +/-
 Morrigan's leather top - 900m-1.2b +/-
 Morrigan's leather chaps - 900m-1.2b +/-
 Morrigan's throwing axe - 300-400m +/-
 Morrigan's javelin - 700-800m +/-
 Abyssal dagger imbue scroll - 70-90m +/-
 Dark bow imbue scroll - 40-50m +/-
 Barrelchest anchor imbue scroll - 40-50m +/-
 Dragon mace imbue scroll - 20-25m +/-
 Dragon longsword imbue scroll - 20-25m +/-
 Bounty hunter ornament kit - 70-80m +/-
 Elder maul ornament kit - 50-60m +/-
 Heavy ballista ornament kit - 35-40m +/-
 Elder chaos robes ornament kit - 25-30m +/-
~ DT2 (Vardovis, Duke, Leviathan, Whisperer) ~
 Soulreaper axe - 18-21b +/-
 Virtus mask - 700-900m +/-
 Virtus robe top - 1-1.5b +/-
 Virtus robe bottom - 2.5-3.5b +/-
 Ultor ring - 3.5-4.5b +/-
 Magus ring - 3-4b +/-
 Venator ring - 5-5.5b +/-
 Bellator ring - 10-11b +/-
 Chromium ingot - 700-900m +/-
 Awakener's orb - 200-300m +/-
~ Cerberus ~
 Smouldering stone - 700-900m +/-
 Infernal pickaxe - 700-900m +/-
 Infernal axe - 700-900m +/-
 Primordial boots - 40-42m
 Pegasian boots - 36-38m
 Eternal boots - 30-32m
 Abyssal bludgeon - 5-6m
 Abyssal dagger - 5m
~ Demonic Gorilla ~
 Uncut zenyte - 350-450m +/-
 Amulet of torture - 350-450m +/-
 Necklace of anguish - 350-450m +/-
 Tormented bracelet - 350-450m +/-
 Ring of suffering - 300-400m +/-
 Heavy ballista - 40-42m
~ Zulrah ~
 Magic fang - 400-500m +/-
 Toxic staff of the dead - 450-550m +/-
 Trident of the swamp - 275-325m +/-
 Serpentine helm - 150-200m +/-
 Toxic blowpipe - 125-150m +/-
~ Revenants ~
 Revenant ether - 15-25k ea +/-
.png/revision/latest?cb=20180806120319) Viggora's chainmace (u) - 30-50m +/-
Viggora's chainmace (u) - 30-50m +/-
.png/revision/latest?cb=20180726105142) Craw's bow (u) - 15-20m +/-
Craw's bow (u) - 15-20m +/-
.png/revision/latest?cb=20180726105143) Thammaron's sceptre (u) - 7-10m +/-
Thammaron's sceptre (u) - 7-10m +/-
~ Phantom Muspah ~
 Venator bow - 400-600m +/-
 Saturated heart - 200m +/-
 Venator shard - 75-125m +/-
~ God Wars~
 Bandos godsword - 20-25m
 Bandos chestplate - 25-35m
 Bandos tassets - 25-35m
 Bandos boots - 5m
 Armadyl godsword - 95-110m +/-
 Armadyl helmet - 100-125m +/-
 Armadyl chestplate - 20-25m
 Armadyl chainskirt - 20-25m
 Armadyl crossbow - 100-125m +/-
 Saradomin godsword - 20-25m
 Saradomin sword - 5-10m
 Zamorak godsword - 20-25m
 Zamorakian hasta - 10-20m
 Zamorakian spear - 5-10m
 Staff of the dead - 5-10m
~ Diverse ~
 Book of the dead - 2-2.5b +/-

 Neitiznot faceguard | Basilisk Jaw - 375-450m +/-
 Ancient wyvern shield - 150-250m +/-
 Imbued Heart - 50-60m +/-
 Ring of wealth - 25-30m
 Dragonfire shield - 20m
 Guardian Boots 10-15m
 Dragon axe - 10-12m
~ Cannon Set ~
 Cannon barrels - 250-300m +/-
 Cannon base - 250-300m +/-
 Cannon furnace - 250-300m +/-
 Cannon stand - 250-300m +/-
~ Barrows ~
 Ahrim's set - 5-6m
 Dharok's set - 6-8m
 Guthan's set - 2-3m
 Karil's set - 4-5m
 Torag's set - 2-3m
 Verac's set - 2-3m
~ Caskets ~
 Red Casket - 4-5m +/-
 Green Casket - 9-10m +/-
 Purple Casket - 35-40m +/-
 Gold Casket - 120-140m +/-
 Casket key - 17-20m +/-
~ Miscellaneous Items & Shop Items ~
Note: The value in blue located next to the estimate price range is equivalent to the price Vannaka will automatically buy the item for.
 Staff of light - 10-15m (6m)
 Staff of balance - 10-15m (6m)
 Mage's book - 10-12m (4.8m)
 Tome of fire - 10-12m (4.8m)
 Trident of the seas - 5-7m (3m)
 Amulet of fury - 3.4-4m (3.4m)
 Occult necklace - 3m (2m)
 Berserker necklace - 3m (2m)
 Kraken tentacle - 2-2.5m (2m)
 Robin hood hat - 3m (1.6m)
 Ranger boots - 3m (1.6m)
 Amulet of the damned - 2m (1.2m)
 Infinity boots - 2m (1.2m)
 Archers ring - 2m (1m)
 Seers ring - 2m (1m)
 Warrior ring - 2m (1m)
 Berserker ring - 1.5m (1m)
 Dragon boots - 1.5m (1m)
 Granite maul - 750k (400k)
 Dragon spear - 700k (400k)
 Dragon crossbow - 700k (400k)
~ Party hats ~
 Rainbow partyhat - 8-9b +/-
 Partyhat & Specs - 6-6.5b +/-
 Blue Partyhat - 5-6b +/-
 Black Partyhat - 1.5-2.5b +/-
 Red Partyhat - 400-600m +/-
 Purple Partyhat - 400-600m +/-
 White Partyhat - 400-600m +/-
 Green Partyhat - 400-600m +/-
 Yellow Partyhat - 400-600m +/-
Note: If you have a correction for this guide or a suggestion regarding additional information, please leave a message on the comment section.
4 -
This guide contains detailed information regarding the Phantom Muspah, including its location, gear progression and strategies, amongst others
Note: If you have a correction for this guide or a suggestion regarding additional information, please leave a message on the comment section.

The Phantom Muspah is a solo boss with 3 different forms. All forms have 33% freeze resistance, meaning Muspah will only stay frozen for 66% of the base freeze duration.
Location
SpoilerUsing the Spiritual fairy tree located at Home choose the option: Bosses → Phantom Muspah

Equipment and Gear progression
Spoiler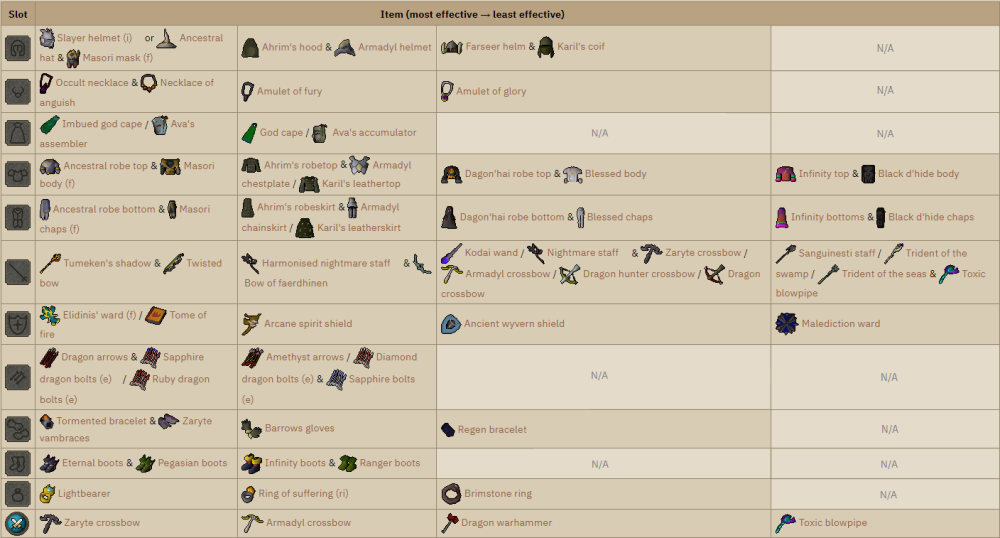
Note: Enchanted sapphire dragon bolts have a 5% chance of triggering the Clear Mind effect, which causes the target to lose prayer points.
The lightbearer, although optional, can be used to significantly increase the special attack regeneration, allowing for more special attacks to be used.
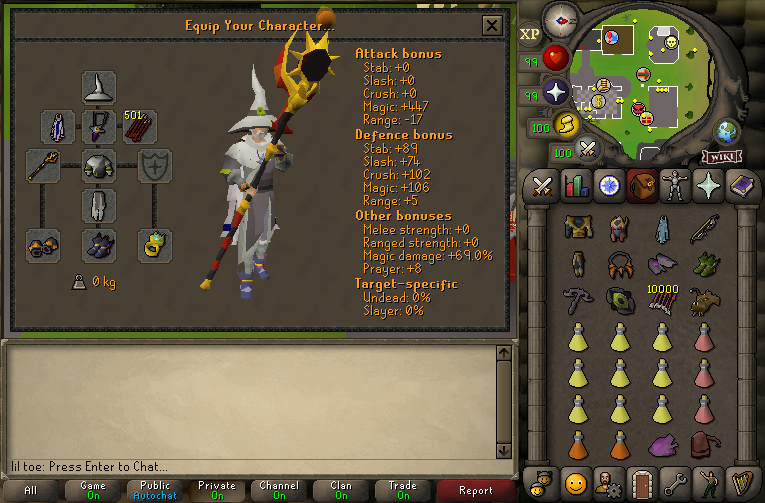
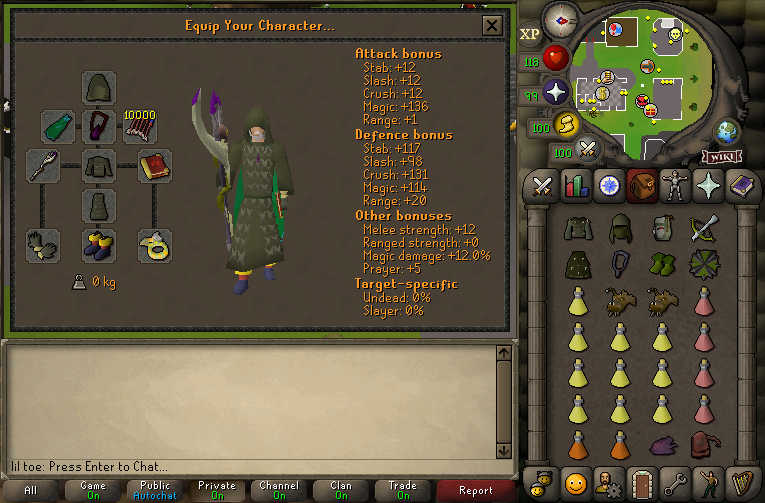
Gear Presets
SpoilerMax setup example
Intermediate setup example

Budget setup example
Strategy
SpoilerThe Phantom Muspah will spawn either in its ranged (which can deal ranged damage) or melee form (which can deal melee damage) and can alternate between the two after taking roughly 100 damage.

Ranged form (can deal ranged damage and occasionally magic damage)

Melee form (can deal only melee damage)
Throughout the fight, the Phantom Muspah will change forms after taking roughly 100 damage. During each transition, Muspah will slam the ground, creating spikes around the arena; one on the player's position during the transition and a few elsewhere. Standing on a spike will knock the player back to a clear tile and heal the boss for ~75% of the damage dealt (in osrs wiki).
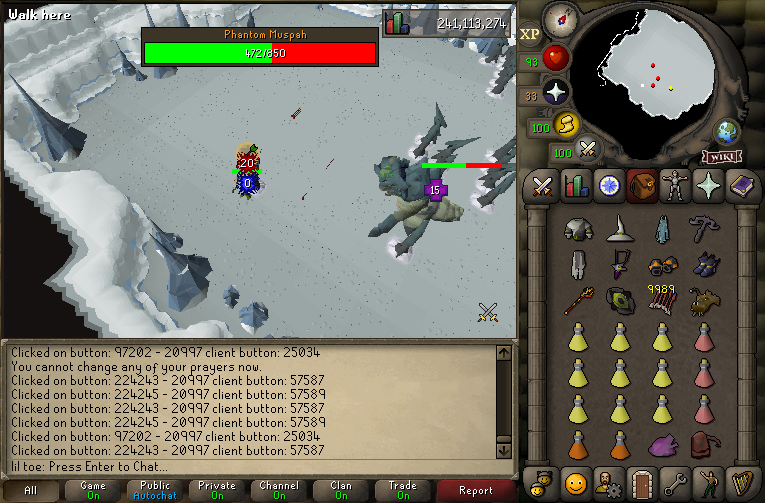
Occasionally, the Phantom Muspah will charge up for a magic attack during its range form, which may apply corruption onto players and drain prayer points (when this animation starts, immediately use Protect from Magic to completely block the attack).
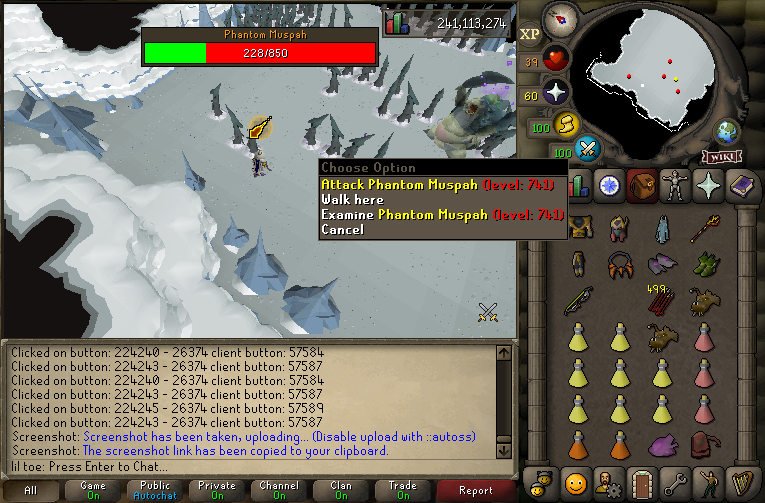
During its melee form, it can deal increased damage the longer it stands still, so it is imperative not to let the boss reach you (in osrs wiki).
The boss will always have two special attacks lined up after a certain amount of health is depleted: if it spawns in the melee form, it will use Homing Spikes first; if it spawns in the ranged form, it will use Charged clouds first.
• Homing Spikes - Muspah will slam the ground, causing 2-4 spikes to home in on the player. After ~20 seconds, the spikes harden and remain in place. Players can stand behind hardened spikes or icicles to avoid the homing spikes from reaching them if there's more than one spike grouped together.
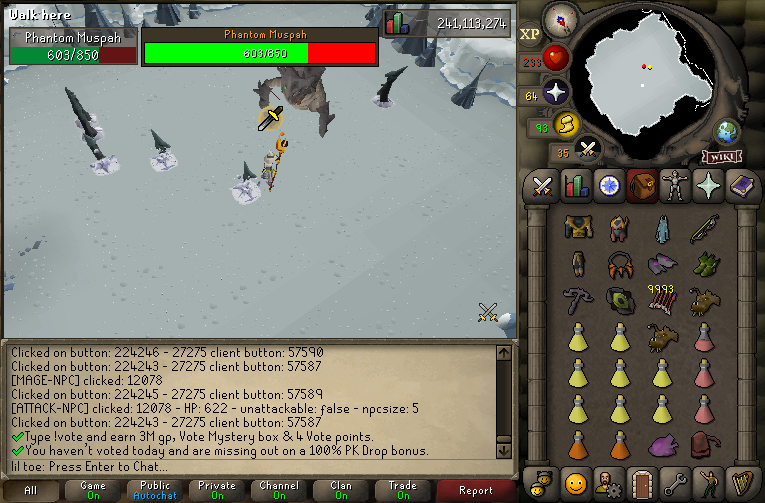
• Charged Clouds - Muspah will rapidly teleport around the arena, leaving behind charged clouds that travel across the area. Getting hit by a cloud will deal up to 20 damage, though they can be avoided by standing on a specific tile. The Phantom Muspah will always appear to the north-east when the move is finished. It can still be attacked while teleporting around the arena.
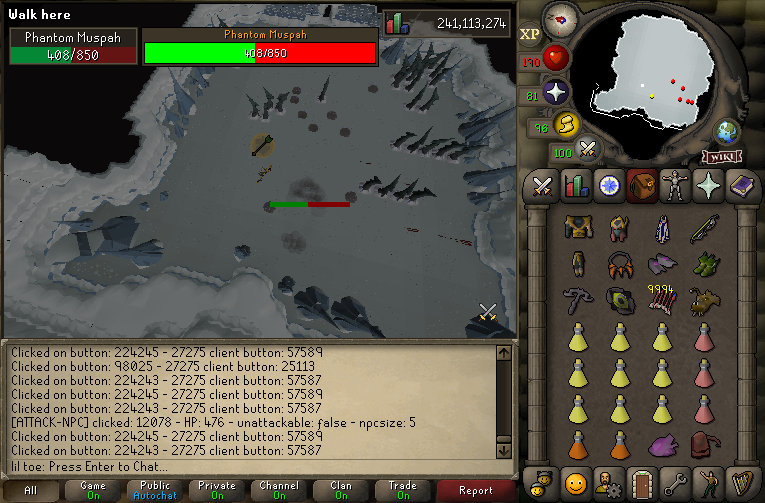
Upon reaching less than 150 health, Muspah will teleport to the centre of the arena and unleash a massive shockwave that must be avoided by standing behind a spike.
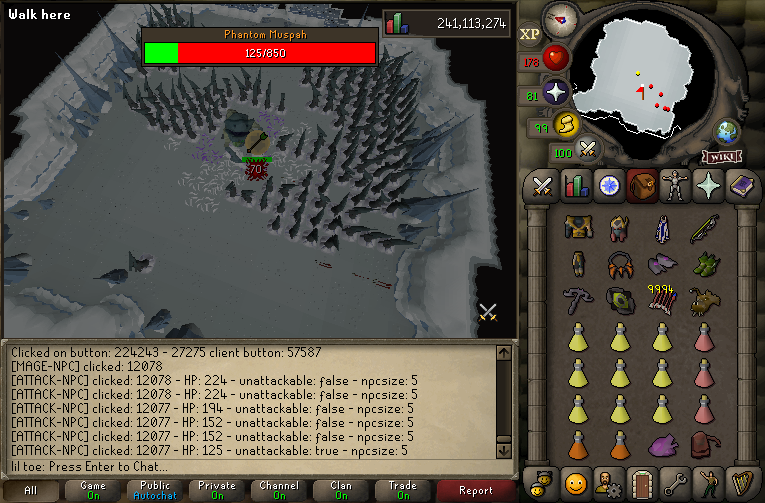
Afterwards, it will change into its shielded form, activating a prayer shield and Soul Split. The prayer shield can only be depleted by prayer draining methods (e.g. enchanted sapphire bolts and Smite prayer).
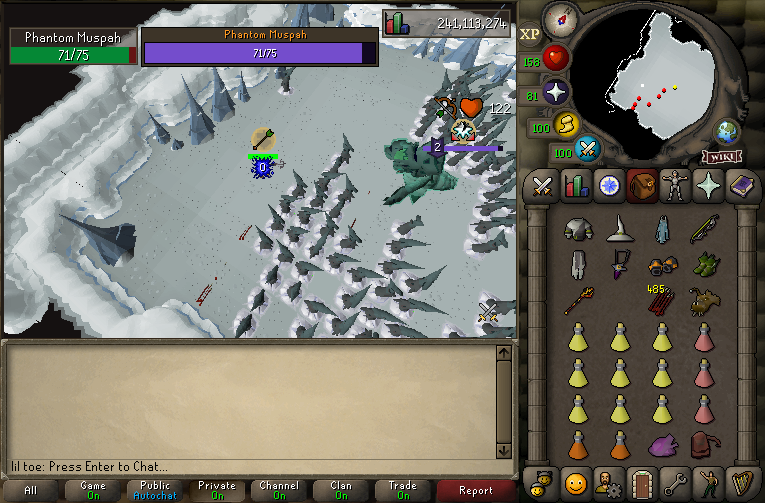
After the shield is depleted it will return to its ranged form and spawn a large numbers of spikes until defeated (in osrs wiki).
Muspah Kc Completion
Spoiler
Note: If you have a correction for the guide or have a suggestion for a new method, please leave a message on the comment section.1 -
This guide contains detailed information regarding the skill Hunter, including its location, a list of methods and their requirements, amongst others
Note: If you have a correction for this guide or a suggestion regarding additional information, please leave a message on the comment section.

Hunter is a skill in which players catch different creatures, obtaining several rewards. The hunting equipment can be bought from Vannaka (located at ::shops). There are various ways of raising up this Skill efficiently. This Guide will go over the fastest, the most efficient, and the most profitable, alternative methods of leveling up Hunter from 1 to 99.
Location
SpoilerYou can teleport to the Hunter island by using the Spiritual fairy tree located at ::home, choosing the option: Skilling - Hunter island
You can teleport to the Chinchompa hill by typing ::chins or by using the Spiritual fairy tree located at ::home, choosing the option: Wilderness - Chinchompa hill
Hunting equipment
SpoilerDepending on your chosen Hunter Skilling methods, you will need all or at least some of these items:
 Bird Snares - Used for catching Birds.
 Box Trap - Used for catching Chinchompas.
Note: You can buy the hunting equipment from Vannaka (located at ::shops) > Skilling tab
Hunting methods
Spoiler The Crimson swift is a red bird captured with bird snares, requiring lvl 1 Hunter, granting 680 Hunter experience.
 The Golden warbler is a golden bird captured with bird snares, requiring lvl 5 Hunter, granting 940 Hunter experience.
 The Copper longtail is a copper-coloured bird captured with bird snares, requiring lvl 9 Hunter, granting 1224 Hunter experience.
 The Tropical wagtail is a green bird captured with bird snares, requiring lvl 19 Hunter, granting 1904 Hunter experience.
 The Chinchompa can be captured with a box trap, requiring lvl 53 Hunter, granting 3965 Hunter experience.
 The Carnivorous chinchompa can be captured with a box trap, requiring lvl 63 Hunter, granting 5300 Hunter experience.
 The Black chinchompa can be captured with a box trap, requiring lvl 73 Hunter, granting 6300 Hunter experience.
Note: If you have a correction for the guide or have a suggestion for a new method, please leave a message on the comment section.
1 -
This guide contains detailed information regarding the Tombs of Amascut, including its location, raid level and invocations, strategies, consumables and gear presets, amongst others.
Note: If you have a correction for this guide or a suggestion regarding additional information, please leave a message on the comment section.
----------------------------------------------------------------------------------------------------------------------------------------------------------------------------------------------------------------------------------------------------------------
The Tombs of Amascut is a raid that makes use of the invocation system, allowing players to customise the difficulty of the raid by choosing to enable various invocations that act as difficulty modifiers to the raid. The current runewild version only contains the final boss, which consists of two twins bosses: Tumeken’s Warden and Elidinis Warden.
Location
SpoilerUsing the Spiritual fairy tree located at Home choose the option: Bosses → Tombs of Amascut.

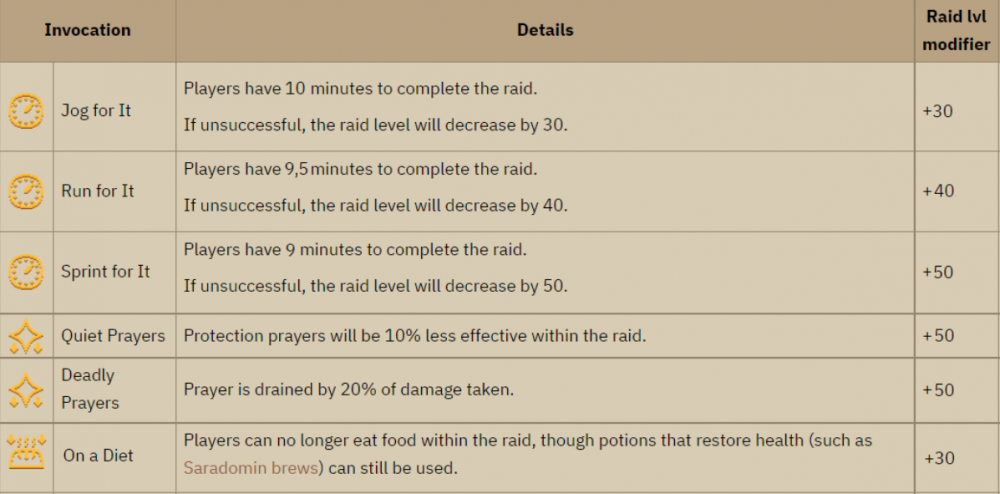
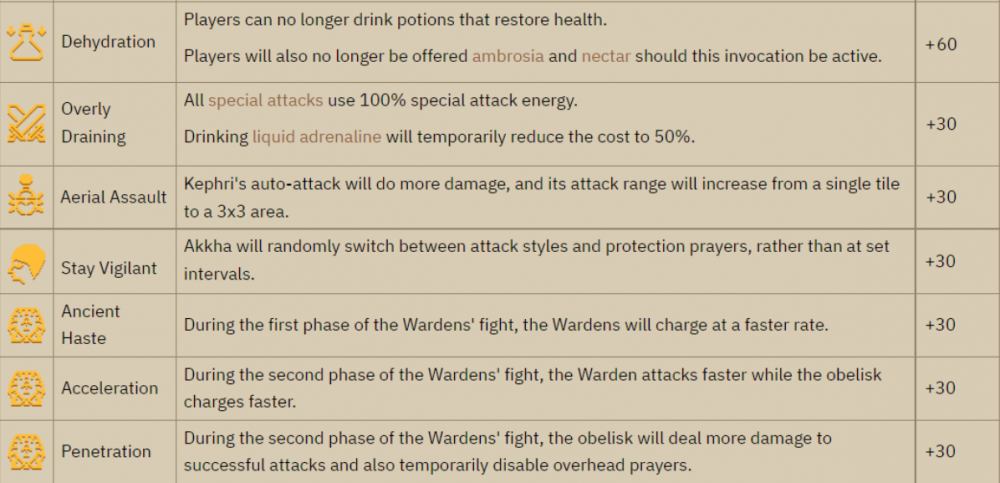
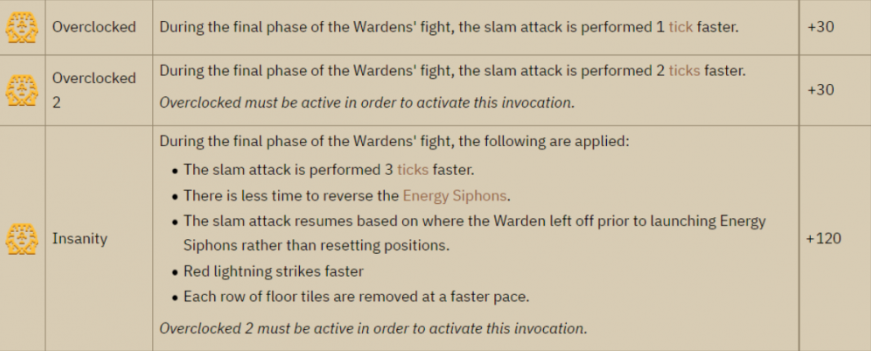
Raid Level and Invocations
SpoilerThe Tombs of Amascut makes use of the invocation system, which allows players to customise the difficulty of the raid by choosing to enable various invocations, setting a raid level which adjusts the stats of NPC’s within the raid.
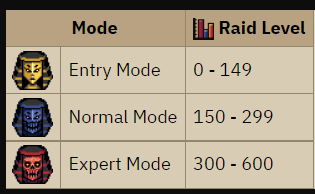
Upon starting a raid the players can select their preferred invocations on the invocations interface, as well as view the raid level and unique rewards that are realistically obtainable at the raid level.
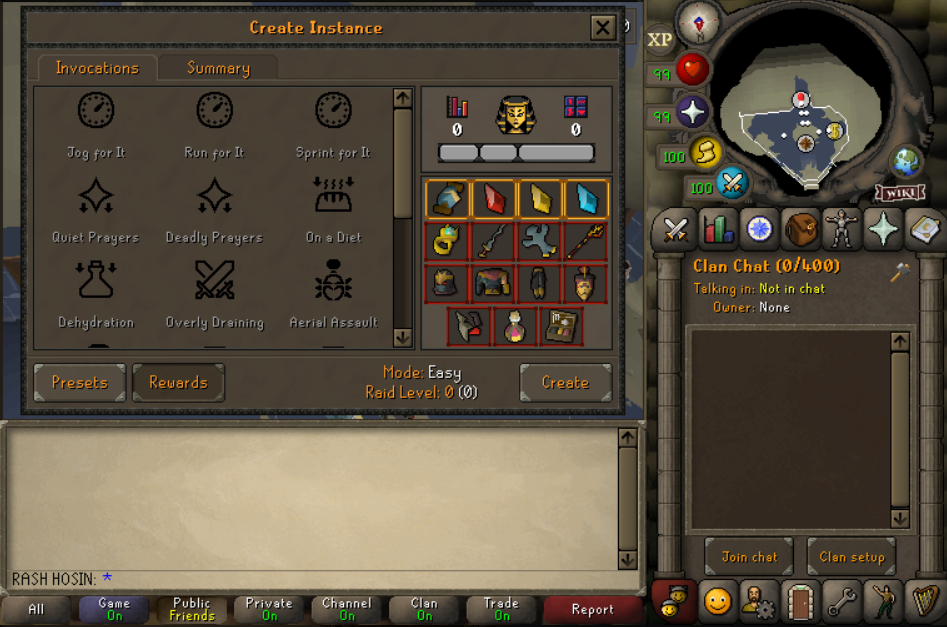
Note: Apart from making the raid harder, a higher raid level increases the player’s overall drops and the chances for unique items to be rolled, which are shown in the raid party’s invocation tab within the raid party interface.
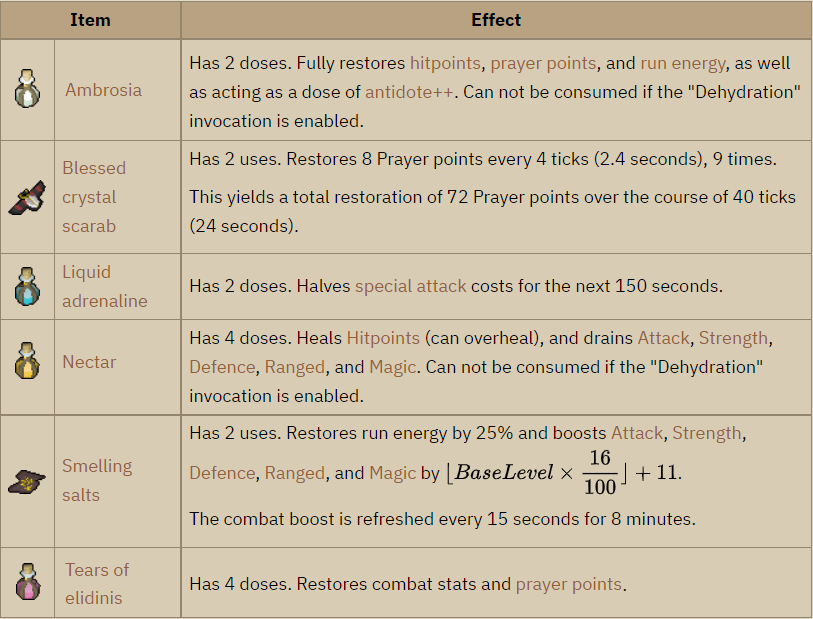
Consumables
SpoilerConsumable items are received from supplies given by the Helpful Spirit upon entrance of the Tombs of Amascut.
Equipment
SpoilerMagic Equipment
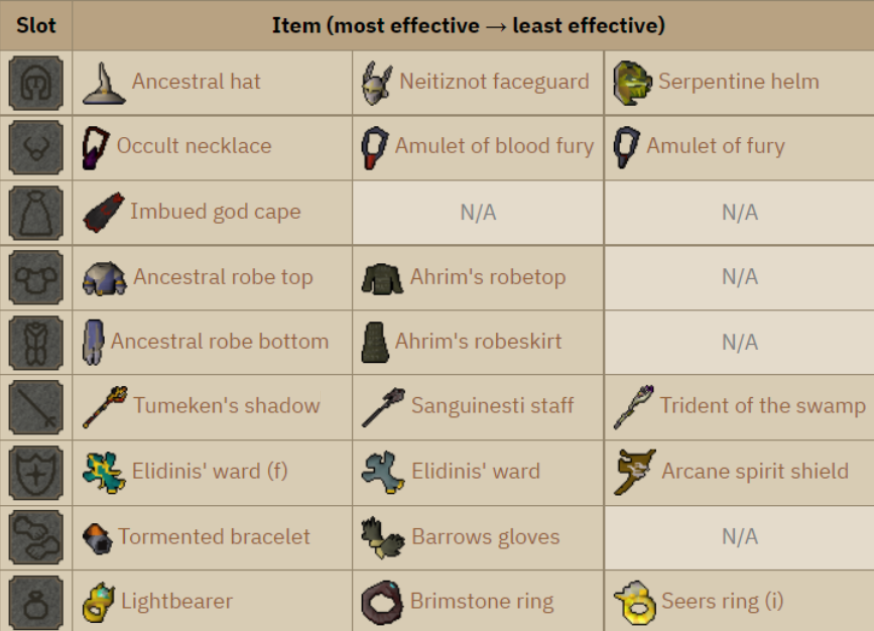
Range Equipment
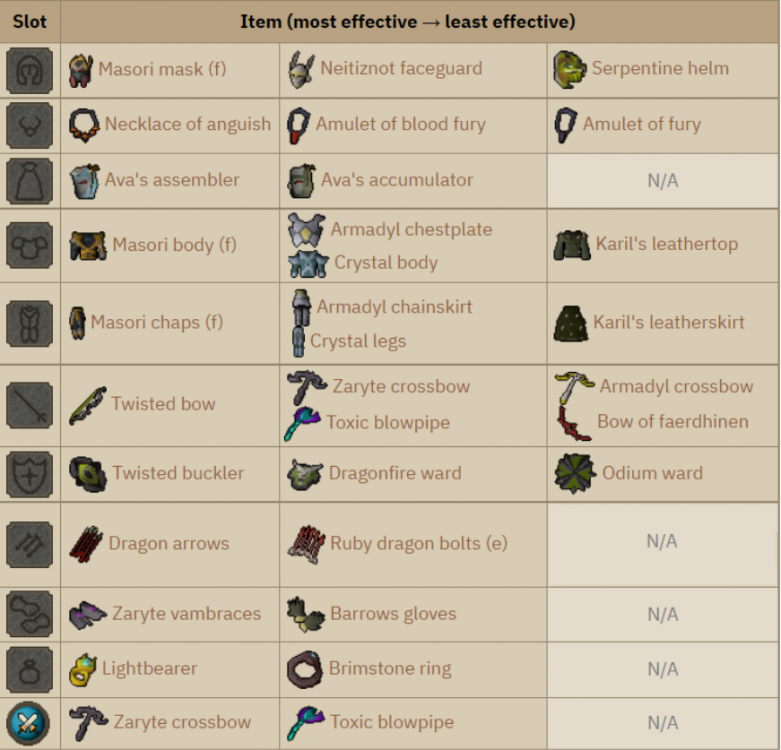
Melee Equipment

Note: The dragon dagger coupled with liquid adrenaline is highly effective as it can deal massive damage to the core with its low special attack cost
The lightbearer, although optional, can also be used to significantly decrease special attack costs to allow for more special attacks to be used.
The statius warhammer/dwh can also be used to decrease the target's current Defence level by 30%.
Gear Presets
SpoilerMax setup example

Intermediate level setup example

Welfare setup example

Note: The keris partisan of the sun has a special attack which consumes 50 prayer points in addition to 75% of the player's special attack energy, causing the players to fully heal to their maximum health and overheal up to 20% of their base Hitpoints level.
Strategy
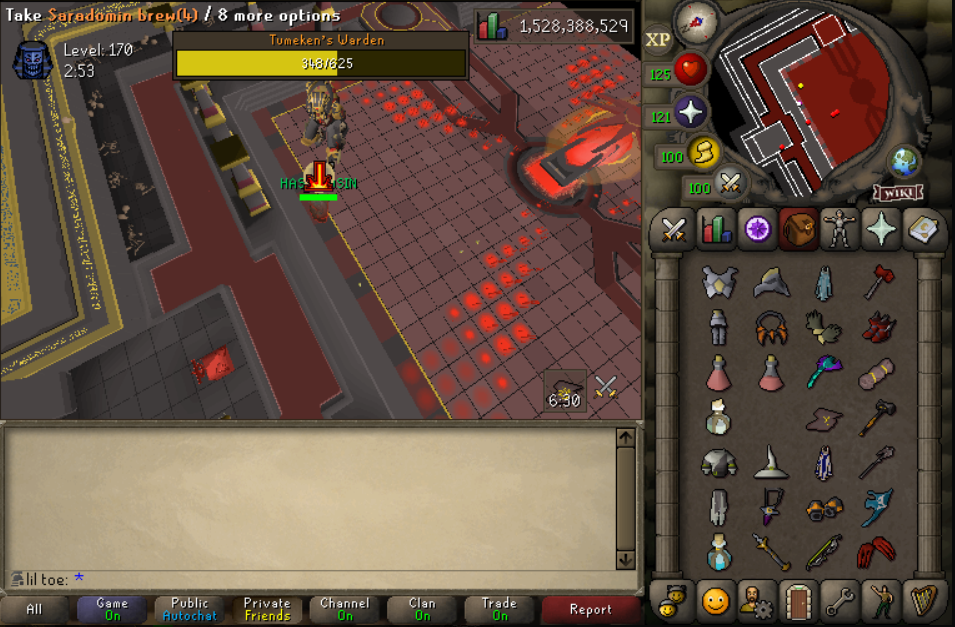
SpoilerBefore starting the fight apply a dose of smelling salts and drink a dose of liquid adrenaline if necessary. To begin the fight, a party member must speak to Osmumten.
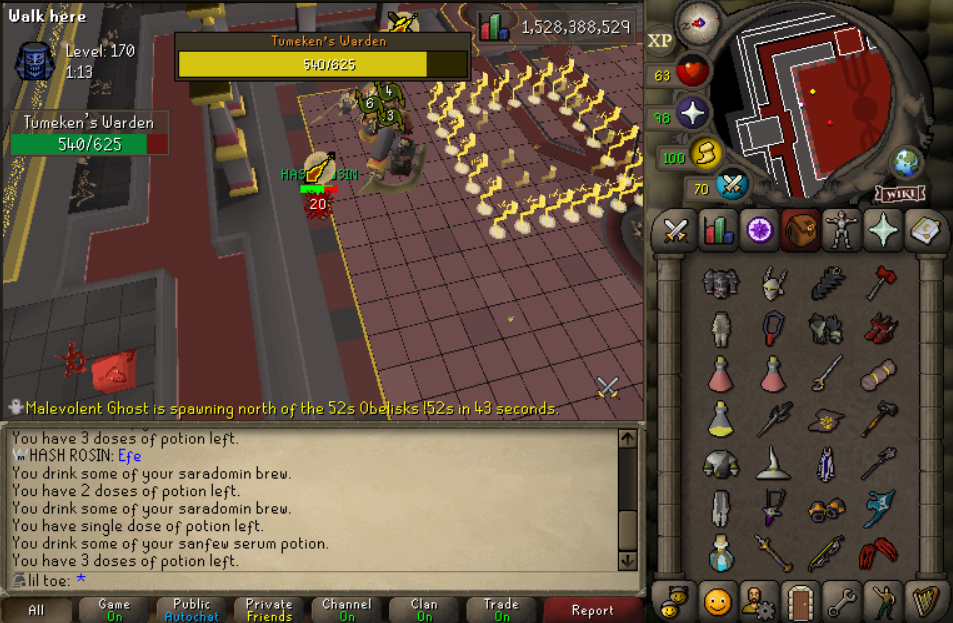
Phase 1 - Obelisk
SpoilerDuring the first phase of the battle, the obelisk will begin to emit orbs that transfer energy to the Wardens. Players can block these orbs by standing on either side of the energy troughs. This will significantly reduce, although not prevent, the Wardens' energy gain, however each orb absorbed will cause the player to take 3 damage. It is recommended to block one side of the energy troughs to desynchronise the Wardens' charged attacks, as it is much harder to avoid them if they are launched simultaneously. Players may also choose which Warden to fight in the second phase by selectively blocking the flow of energy to the Warden that they would rather avoid (in osrs wiki).
When a Warden is charged up, it will discharge one of two types of attacks:
Charged Shot - Slow-moving balls of energy will be shot towards players for unavoidable damage. In case of a large ball of energy, stand next to or on top of each other to disperse damage. Otherwise, stand apart from other players to minimize the amount of damage.

UFOs - Small floating pyramids will spread throughout the area and discharge damaging lights. Blocking the energy paths can cause the timings between each to be offset, therefore avoiding damage.
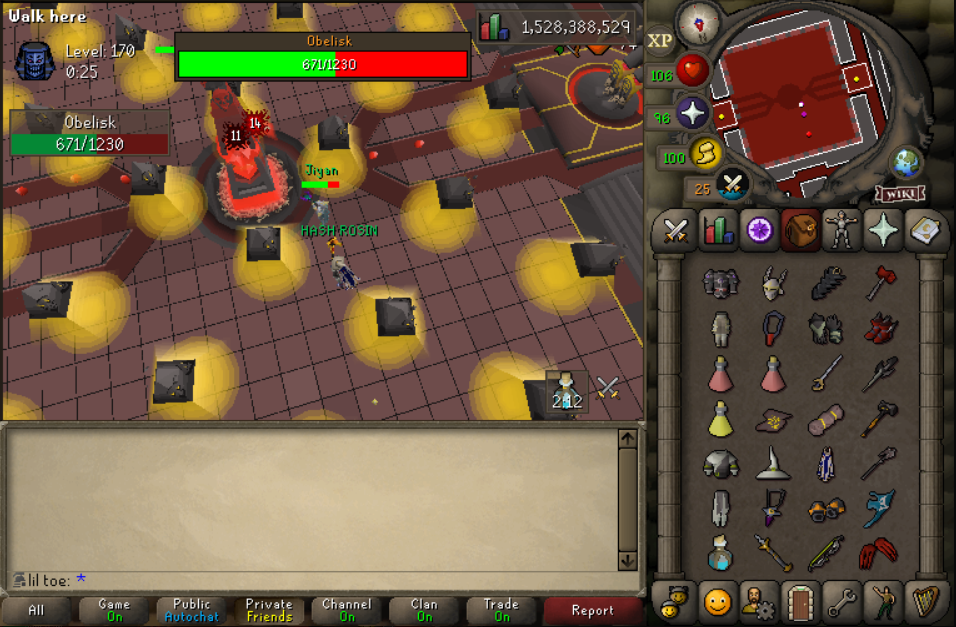
The Wardens will alternate between UFOs and Charged Shot respectively until the phase ends. Once the obelisk's health hits zero, the Warden whose energy gain was disrupted the most will be destroyed, but the other will activate and engage players in the fight (Phase 2).
Phase 2 - Warden
SpoilerRegardless of which Warden powers up, the second phase of the fight is nearly identical. The Warden will always have protection prayers active against two attack styles, with Protect from Melee being always active; however Tumeken's Warden will always initially pray against magic, while Elidinis' will initially pray against ranged (in osrs wiki).
While the player is fighting the Warden, the obelisk will also discharge a series of attacks:
Converging Beam - The obelisk will shoot out two beams reaching either the north and south or the west and east end of the arena. Each beam will spread out and converge towards the obelisk. Players may avoid the damage from the incoming beams by running over them with proper timing. Red lightning will surround the obelisk as a warning indicator for the attack.

Windmill Beam - The obelisk will periodically shoot out beams clockwise in four directions like a windmill. The floor will briefly glow before the beam is discharged, giving players some time to move away from it. Orange lightning will surround the obelisk as a warning indicator for the attack.
Lightning Skull - The obelisk will launch several red skulls and discharge lightning outward in a 7x7 area from where the skull landed. Yellow lightning will surround the obelisk as a warning indicator for the attack.
Once the Warden's core is ejected, players must damage it as it essentially acts as the Warden's "true" health. Damage dealt to the core deals five times the damage towards the Warden, so a hit of 55 would deal 275 damage (in osrs wiki). The dragon dagger is a solid weapon against the core as each special only costs 25% (12.5% with liquid adrenaline).

After some time, the Warden will reclaim its core and change its overhead prayers, with Tumeken's Warden now praying against ranged instead of magic, and Elidinis' now praying against magic instead of ranged. They will always alternate between this and their initial prayers each time the core is exposed until the phase ends. The core will be exposed for a longer time each time the Warden is disabled.
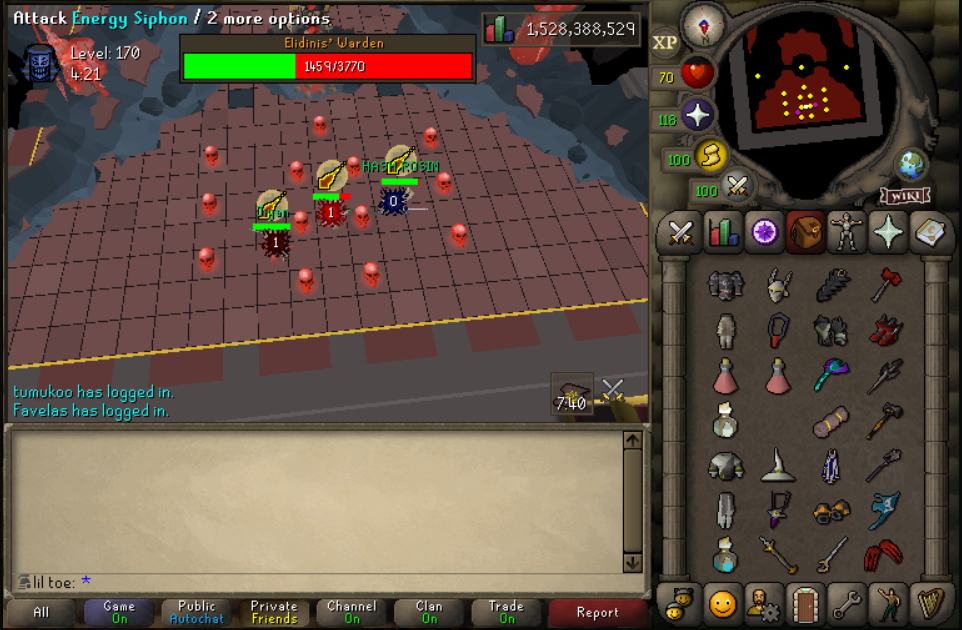
Once the Warden's core is destroyed, its body will collapse. However, it will use the last of its power to restore the Warden that was destroyed at the end of the first phase. The obelisk will grow unstable and explode, and the room becomes warped in a void, beginning the final phase of the fight (Phase 3).Phase 3
SpoilerThe restored Warden will not use any protection prayers or perform any combat style attacks. Rather, it will raise/slam the ground as its primary means of attack.
The Warden will always raise the floors to its right first, then its left, and lastly slam the ground in both directions. For the Warden's side attacks, players must stand at least one tile left/right from the center opposite of where the Warden is facing. When the Warden slams in both directions, players must stay in the center tiles in front of its face (in osrs wiki).

Upon reaching 80%, 60%, 40%, and 20% of its health, the Warden will stop slamming the ground and become invulnerable. It will then launch energy siphons onto the arena, which must be disabled by using a melee weapon. Successfully disabling all of the siphons will inflict massive damage back to the Warden. The Warden will reset its slam rotation to target the right side first if the Insanity invocation is not active; if it is, then the Warden will resume the pattern as before the energy siphons spawned.
At the second and third thresholds, phantoms of the bosses from earlier in the raid will appear and assist the Warden against the player. The first phantom will spawn east; if Elidinis' Warden is being fought, this will be Akkha's Phantom, with the other phantom being Kephri's. If Tumeken's Warden is being fought, this will be Zebak's and Ba-Ba's Phantom respectively (in osrs wiki).

When the Warden reaches ~5% of its health, it will heal back to 20% of its max health and become enraged. It will no longer slam the arena, but will instead begin to emit unstable bolts of energy across all walkable tiles in the arena that deal moderate damage to any player standing on a targeted tile.

As the fight progresses, the dark phantom behind the Warden will begin to tear the tiles from the floor, limiting the amount of space players can move around in, up to the first row next to the Warden. Standing on where a tile would be ripped will force the player into the next row and take damage in the process. Keeping ambrosia for this purpose will help minimise distractions.
Death within the Tombs of Amascut
SpoilerIf the entire team is killed, players will lose all unprotected items, which can be later reclaimed from the storage located east to the tombs of amascut entrance or from the Death npc located nearby edgeville bank.

Note: Dying in the tombs of amascut is not a dangerous death for Hardcore ironman.
Caution: If players die a second time without reclaiming the items from the storage, they will be permanently lost.
Solo TOA's completions - VideosSpoilerNote: If you have a correction for the guide or have a suggestion for a new method, please leave a message on the comment section.
4 -
This guide contains a list regarding some of the methods to make money in Runewild, and the requirements to do so.
Caution: The prices and hourly rates are simply an estimate. The actual rates and profit are likely to differ (Price Guide).
Note: There are likely other money maker methods that aren't included in this guide; feel free to suggest them on the comment section.
Voting
Voting is the easiest money maker on runewild as it only requires to vote on 2 websites. After voting you'll be rewarded 6m, 8 vote points (which sell for an average of 5m each) and a vote box. To do so follow these steps:
SpoilerType '::vote' in-game.

Insert the username you wish to vote with.

Vote on both websites.

Note: You may only vote once every 12 hours.
Caution: You cannot vote through your cellphone or while using a vpn.
Revenants
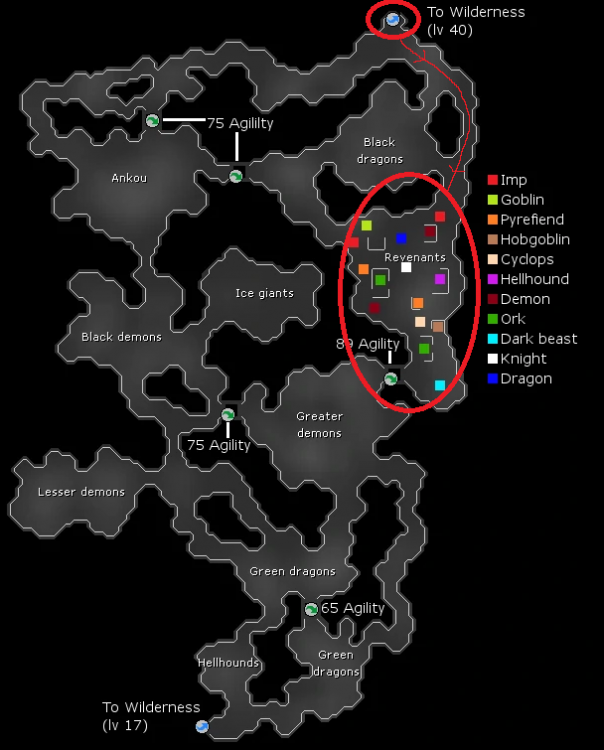
Revenants are monsters that can be found within level 28 to 32 of the Revenant Caves. These are located in a multi-combat zone.
SpoilerLocation
To get there type ::revs and enter the cave located west from the teleport zone. Proceed to walk south until you find revenants.
Gear and Inventory
Welfare gear:

Upgrades can be made according to the money you dispose.
Droptable

Note: Being skulled increases the chance of receiving a drop.
Caution: Revenant caves are usually controlled by multi clans. Beware of potencial pkers.
Zulrah
Zulrah is a Solo-only Snake Boss, located in the Wilderness
SpoilerLocation
Using the Spiritual fairy tree located at Home choose the option: Wilderness → Zulrah

From there, run all the way Northeast, enter the cave, and continue South, passing the jutting wall in order to access the crevice.

Note: For quicker access to Zulrah, interact with your servant pet or use the yellow portal at ::Mdi (Master rank is required).
Gear Progression


Strategy
Throughout the fight, Zulrah will continually dive into the swamp, sending out a plethora of attacks before doing so. It will then re-emerge in its next phase and continue its attacks, usually as a different form:
 Zulrah's serpentine form, in which it will attack with Ranged.
 Zulrah's tanzanite form, in which it will randomly attack with both Magic and Ranged attacks.
During the fight Zulrah will summon snakelings and venom clouds. It is advisable to remain on the tile bellow to minimize additional damage from both of these special attacks.
After defeating Zulrah, if you don't need to bank for supplies, simply use the nearby portal for a swift exit, teleporting you outside the cave. From there, you can re-enter through the crevice for another kc.
Note: Use a ring of recoil/suffering (ri) to kill the snakelings.
Use a ring of wealth (i) to increase your chances of getting a drop.
Wilderness clue scrolls
Wilderness clue scrolls can be obtained as a drop from any sort of monster in runewild. Monsters with higher hitpoints have a greater chance of dropping a clue scroll.
SpoilerHow can i obtain a wilderness clue scroll?
A clue scroll is a random drop from a large variety of monsters, located both in safe areas or the wilderness.
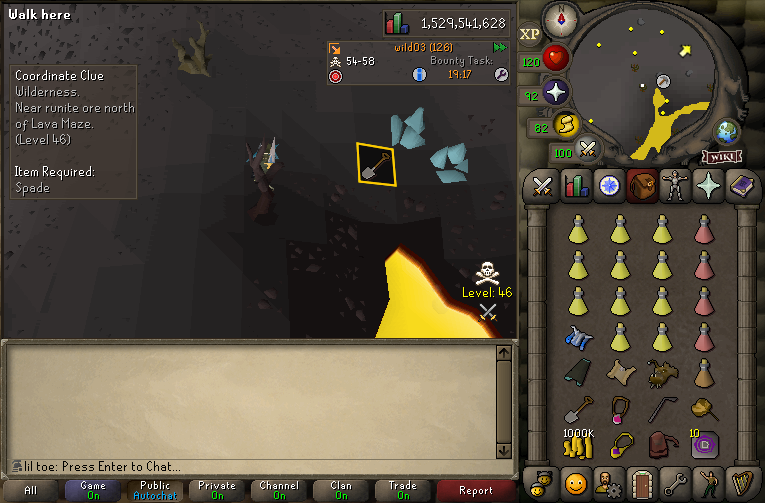
Upon completion of a clue step, you will be assigned another clue step or a reward casket, containing the final reward for the clue scroll. Clue scrolls usually contain between 3 and 4 clue steps and will grant you 20-90M per clue.

Besides the guaranteed 20-90m per clue scroll completed, you will also have a chance on receiving an item from the 3rd-age table.
The average Clue scroll completion will grant you 33m. This estimate is based on more than 250 samples (Data provided by @The Beast and @Eternals).
For more information regarding clue scroll locations, requirements and qol toggles, check the Clue scroll guide.
Note: You can skip the solving part and right-click 'Convert' which will reward you with 10M gp. In case you die whilst completing a clue scroll, your opponent will receive 10M gp and the clue scroll will vanish.
Slayer
Slayer is a skill that allows players to kill monsters that may otherwise be immune to damage. Its by far one of the most profitable skills in Runewild, with the advantage of allowing players to primarily train combat while completing slayer tasks.
SpoilerHow do i get started?
You can get your first slayer task by speaking to the slayer master (Duradel) located at !slayer, who will assign you a task to kill certain monsters based on your slayer level.

Slayer Tasks
You may spend slayer points to cancel or block your current task. If you choose to cancel your task, 30 points will be removed from your account. Please beware you may be assigned the same task in the future. However, if you block the current slayer task, you will not get that assignment again. This will cost you 100 points (you can block up to 5 slayer tasks).

Note: You can choose to skip a slayer task by asking for an easier task. You can also ask for the location of the monsters you were assigned to slay by talking to the slayer master. In case the location is inaccurate, you can also visit the Npc Locations Guide.
Slayer Store
Slayer is a very profitable skill to train, as high levelled slayer monsters, such as slayer bosses, have a multitude of both rare and valuable drops. The higher your slayer level becomes the better tasks you will get.
Additionally, you can use the slayer points collected by completing slayer tasks to buy any items acquirable on the slayer store.

Recommended
As your slayer level increases, the amount of slayer points you acquired will begin to stack.
For maximum efficiency, you should start by unlocking ‘Slayer uppity doo’. This will cost you 150 slayer points and will increase by 30% the amount of points received after completing a slayer task.
Subsequently, its advised that you purchase a Slayer helmet (500 points), succeeded by an Enchant Slayer helmet (150 points).

Note: Ring of wealth (i) rewards you with an extra 10% drop rate while equipped. You can purchase one through slayer store or from the Trade post. Once you reach level 85 Slayer you will be eligible for Elite tasks. Although these will grant you a bigger amount of gp, you should disable them in case you want better experience rates. You can also extend your favourite tasks at Slayer center > Extend
Crystal shards
Crystal shards are items that can be obtained by killing monsters located in the Iorwerth Dungeon. They are necessary to charge various crystal equipment and can also be used to create enhanced crystal keys.
SpoilerLocation
Using the Spiritual fairy tree located at Home (marked red on the minimap) choose the option Dungeons -> Iorwerth Dungeon.

Iorwerth Dungeon

Iorwerth Dungeon Monsters

Enhanced crystal keys
The enhanced crystal key is an upgraded version of the regular crystal key, which is used to open the crystal chest located in !slayer. Players can create an enhanced crystal key by combining a crystal key with 20 crystal shards.
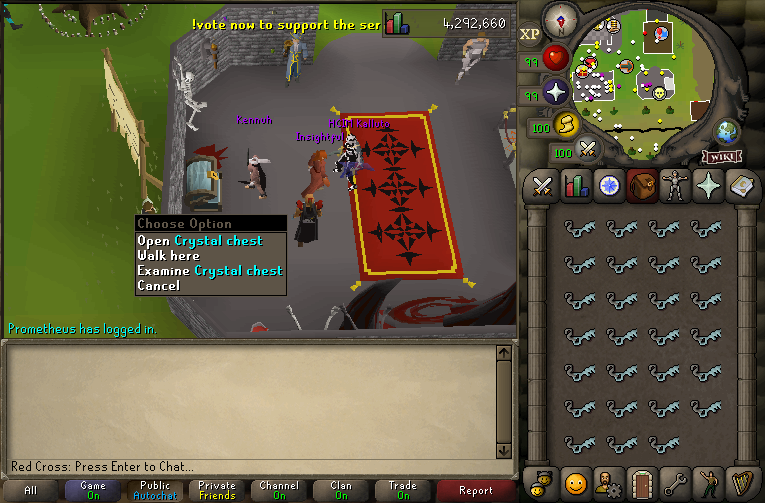
The average drop value of an enhanced crystal key is 5,68m. The profit from opening the chest is expected to be 1,68m after subtracting the cost of a crystal key (1,2m) and the cost of 20 crystal shards (20 x 140k).
This estimate is not exact and may not match your base loot reward everytime. Nevertheless, this value is based on more than 4500 samples, comprising 4 pieces of crystal equipment and 3 bow of faerdhinen drops (Data provided by @Kalluto).
Tombs of Amascut
The Tombs of Amascut is a raid that makes use of the invocation system, allowing players to customise the difficulty of the raid by choosing to enable various invocations that act as difficulty modifiers to the raid.
SpoilerLocation
Using the Spiritual fairy tree located at Home choose the option: Bosses → Tombs of Amascut.

Raid Level and Invocations
The Tombs of Amascut makes use of the invocation system, which allows players to customise the difficulty of the raid by choosing to enable various invocations, setting a raid level which adjusts the stats of NPC’s within the raid.

Upon starting a raid the players can select their preferred invocations on the invocations interface, as well as view the raid level and unique rewards that are realistically obtainable at the raid level.

Note: Apart from making the raid harder, a higher raid level increases the player’s overall drops and the chances for unique items to be rolled, which are shown in the raid party’s invocation tab within the raid party interface.
For more information regarding invocations, consumables, equipment and gear presets, read the Tombs of Amascut Guide
Phantom Muspah
The Phantom Muspah is a solo boss with 3 different forms. All forms have 33% freeze resistance, meaning it will only stay frozen for 66% of the base freeze duration.
SpoilerLocation
Using the Spiritual fairy tree located at Home choose the option: Bosses → Phantom Muspah
Strategy
The Phantom Muspah will spawn in either its ranged (which can deal ranged damage) or melee form (which can deal melee damage) and can alternate between the two after taking roughly 100 damage.

Ranged form (can deal ranged damage and occasionally magic damage)

Melee form (can only deal melee damage)
Throughout the fight, the Phantom Muspah will change forms after taking roughly 100 damage (barring the teleport attack). During each transition, it will slam the ground, creating spikes around the arena; one on the player's position during the transition and a few elsewhere. Standing on a spike will knock the player back to a clear tile and heal the boss for ~75% of the damage dealt (in osrs wiki).
For more information regarding equipment and gear progression, as well as the best strategy to kill it, read the Phantom Muspah Guide.
Average Loot
The average Phantom Muspah kc is worth around 18,5m. This estimate is not exact and may not match your base loot reward everytime. Nevertheless, this value is based on more than 50 samples (Data provided by @The Beast). In addition to the guaranteed base loot mentioned previously, the player will also have a chance on an item from the Phantom Muspah's drop table.

Nex
Nex is a powerful and complex boss, featuring 5 distinct phases with unique abilities.
SpoilerLocation
Using the Spiritual fairy tree located at Home choose the option: Bosses → Nex

Note: You need an agility level of 70 in order to enter the main area of the Dungeon.

To get to the safe room, players must gain 30 Ancient essence. In the main area of the dungeon, killing Zarosian soldiers grant varying amounts of essence:
Spiritual Mages: 5 essence.
Blood Reavers: 3 essence.
Spiritual Warriors/Rangers: 2 essence.
Note: This requirement can be bypassed by having Ultimate rank+
Gear Pre-sets
Best-in-slot Gear
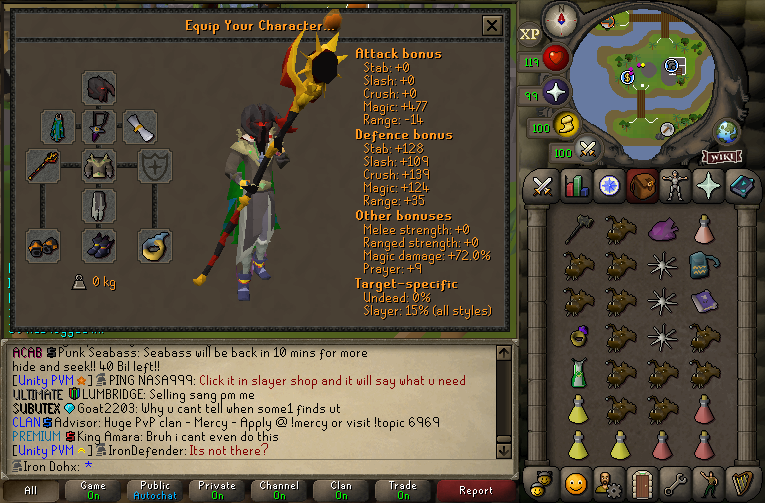
Credits to @Dohx for providing the gear pre-sets.
Max setups without tumeken shadow
Spoiler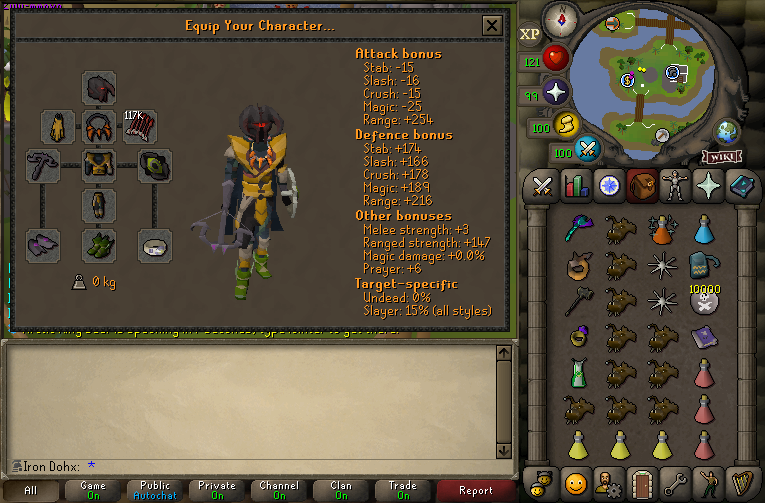

Welfare setups
Spoiler

Strategy
The battle with Nex unfolds within a circular chamber featuring a cross-bridge that mirrors the iconic symbol of Zaros. This battle comprises five distinct phases: Smoke, Shadow, Blood, Ice, and the Zaros phase. Positioned at the four corners of the room are four level 285 mages—Fumus, Umbra, Cruor, and Glacies—each embodying the elemental forces integral to the Ancient Magicks wielded by Nex during the initial four phases.
 Smoke phase
In the initial phase of the battle, Nex unleashes the Smoke phase by shouting, 'Fill my soul with smoke!'. During this stage, Nex employs the Smoke Rush spell, capable of inflicting poison upon players.
SpoilerHer special attacks in this phase are:
Choke - Nex declares, 'Let the virus flow through you!' Targeting the player situated farthest away with the least magical defense bonus, this attack infects the chosen player.
Drag - Nex will drag a random player towards her, stunning them and deactivating their protection prayer.
Smoke Dash - Nex will shout ‘There is... NO ESCAPE!’ and dart down one of the four aisles in the chamber for up to 50 damage.
After Nex reaches 80% health (2720 hitpoints), she will shout 'Fumus, don't fail me!' Now, her mage Fumus will become vulnerable and must be killed to proceed to the next phase.
 Shadow phase
Nex's second phase, known as the Shadow phase, is heralded by her command, 'Darken my shadow!'. In this stage, Nex employs shadow shots, classified as Ranged attacks. Activating Protect from Missiles provides a crucial defense, halving the damage inflicted by these shadow shots.
SpoilerHer special attacks in this phase are:
Shadow Smash - Nex will shout 'Fear the shadow!'. Deadly shadows will appear under every player. Players have three ticks to move out of their way before they erupt and deal up to 50 damage.
Embrace Darkness - Nex will shout 'Embrace darkness!'. The chamber will be darkened drastically. The closer players are to Nex, the darker the room will be. If players stand next to Nex, they will take constant damage from the pure shadow.
After Nex reaches 60% health (2040 hitpoints), she will shout 'Umbra, don't fail me!'. Now, her mage Umbra will become vulnerable and must be killed to proceed to the next phase.
 Blood phase
Nex's third phase, referred to as the Blood phase, is marked by her declaration, 'Flood my lungs with blood!'. Throughout this stage, Nex deploys Blood Barrage against players, which replenishes her health by a percentage of the damage dealt.
SpoilerHer special attacks in this phase are:
Blood Siphon - Nex will shout 'A siphon will solve this!'. Nex will summon up to eight blood reavers (depending on team size) and kneel down for about 8 ticks. During this, all damage she receives will instead heal her. When a new siphon is used, the previous siphon's reavers, if any, will die and heal Nex for their remaining health.
Blood Sacrifice - Nex will shout 'I demand a blood sacrifice!'. A single player will be marked for sacrifice, and will glow red. The marked player has about four seconds to move at least seven tiles away from Nex, otherwise they will be dealt up to 50 damage .
After Nex reaches 40% health (1360 hitpoints), she will shout Cruor, don't fail me! Now, her mage Cruor will become vulnerable and must be killed to proceed to the next phase.
 Ice phase
Nex's fourth phase, the ice phase, starts when she shouts 'Infuse me with the power of ice!'. During this phase, Nex will use Ice Barrage against players, which will freeze them if they are not praying Protect from Magic.
SpoilerHer special attacks in this phase are:
Containment - Nex will shout 'Contain this!'. She will smash the floor and icicles will appear in a 5x5 area around her. Getting caught in this can damage players up to 60 hitpoints and will deactivate protection prayers.
Ice Prison - Nex will shout 'Die now, in a prison of ice!'. She will freeze a targeted player using an ice stalagmite attack, spawning stalagmites within a 3x3 AoE centred on the target player and deactivating their protection prayers. Four seconds after forming, the prison will shatter, dealing up to 75 damage to everyone inside it if one of the stalagmites were not destroyed. To destroy these, use either stab or crush-based attacks.
After Nex reaches 20% health (680 hitpoints), she will shout Glacies, don't fail me! Now, her mage Glacies will become vulnerable and must be killed to proceed to the last phase.
 Zaros Phase
Nex's fifth and final phase, the Zaros phase, starts when she shouts 'NOW, THE POWER OF ZAROS!'. During this phase, Nex will call on Zaros' power, healing her for 500 hitpoints, and will only use her melee and non-attuned magic attacks.
SpoilerIn addition, she will use several Ruinous Powers, which are Zarosian prayers, in this final phase of the fight:
 Soul Split - An overhead prayer in which Nex will heal a small percentage of her health for every successful hit she inflicts.
 Deflect Melee - An overhead prayer in which Nex will activate a variant of Protect from Melee that deflects the damage the player would have dealt to her with melee attacks.
 Wrath - An overhead prayer when Nex shouts 'Taste my wrath!'. This is a stronger version of Retribution, and deals up to 50 damage to players within a 5x5 radius of Nex upon her death.
Average LootThe individual drop rate is affected by the size of the player group. Consequently, small groups (Nex duos and trios) have a significantly higher drop chance compared to Nex masses. Additionally, achieving MVP, which is determined by dealing the most damage, enhances your likelihood of obtaining a drop. Guide will be updated with an average value for base drop loot.

Esoteric Emblems
Esoteric emblems can be obtained as a reward from killing a Bounty hunter target. This player killing minigame is located in the Edgeville wilderness.
SpoilerHow can i get a Bounty hunter target?
Bounty hunter targets will be assigned as you enter the Edgeville wilderness.
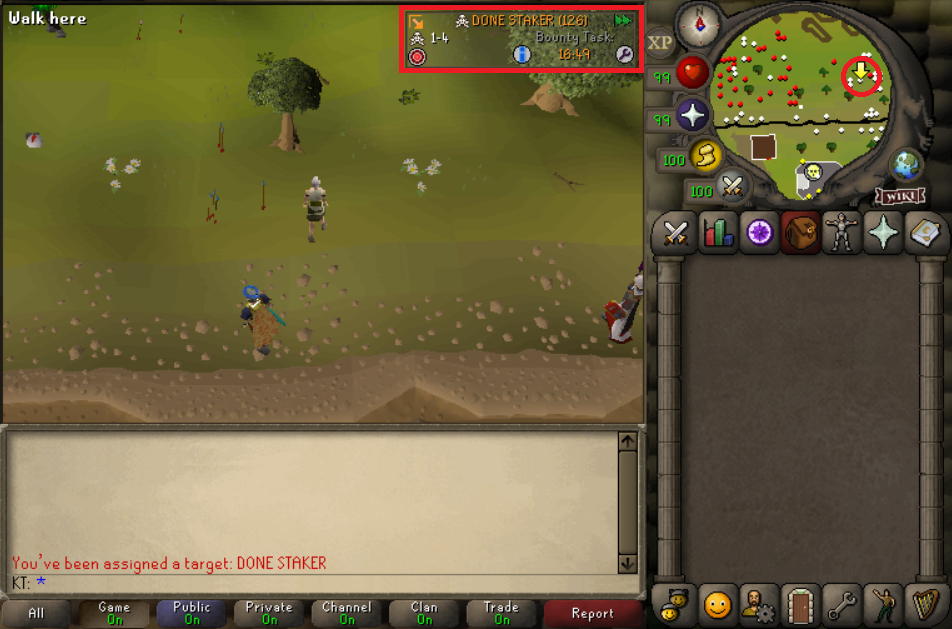
Where can i sell my Esoteric emblems?
Players can sell their emblems to the Emblem Trader, which is located few tiles south from the ::home teleport.

How can i upgrade my Esoteric emblem?
There are 10 tiers of emblems with increasing values. These can be upgraded by killing Bounty hunter targets.
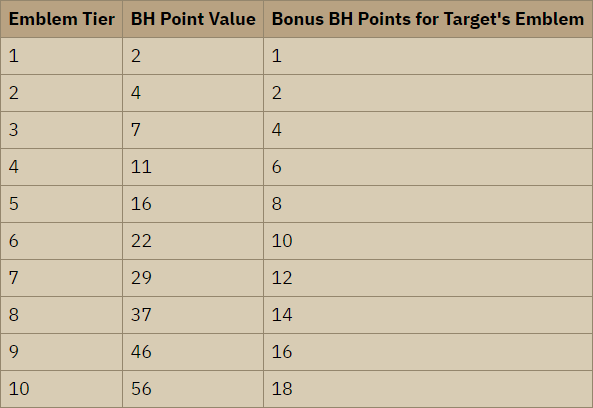
Note: Upon selling an Esoteric emblem, players will also receive Pk points equivalent to the corresponding Archaic emblem's tier.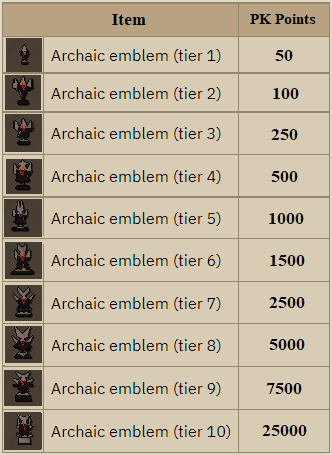
What can i do with BH points?
The Bounty Hunter Store is a store run by the Emblem Trader. Here, players can purchase items with their accumulated points obtained from killing Bh targets.

What can i do with PK points?
Pk points can be used to buy items on the PK Points Store. These can also be sold on the Trade Post for an average of 2k each.

Battle mages
Battle mages are magic-users found in the Wilderness Mage Arena.
SpoilerLocation
To get there teleport to mage bank (::mb) or use ::alever and follow the route marked in red.

Gear and Inventory
Welfare Gear

Caution: You must risk an amount of 20m gp to be able to attack battle mages. Bring a knife to cut the webs.
Note: Protect from Magic prayer is required when battling battle mages.
Seasonal Tickets
Seasonal tickets (Winter tickets) can be obtained either by defeating the Ice Demon or by killing the Little Ice Demons located in the wilderness.
SpoilerWhere are these monsters located?
The Little Ice Demons can spawn in 10 possible locations (marked in red). The Ice Demon will only spawn near the Demonic Ruins (marked in green).

Note: The Little Ice Demons will spawn once every 10 minutes after being killed whilst Ice Demon will only spawn once every 3 hours.
In each location will be spawned 3 Little Ice Demons, each one dropping 100 Winter tickets.
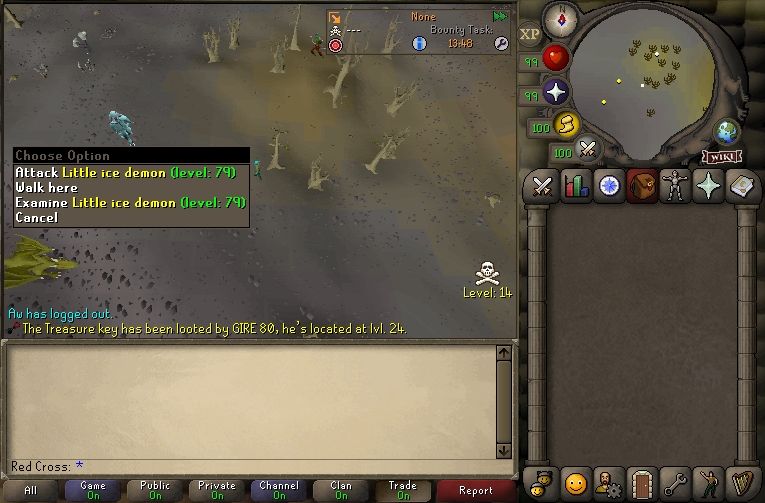
What can I do with the Winter tickets?
Winter tickets sell for an average of 25k each. These can also be exchanged for a Winter box after bringing 20.000 Winter tickets to the Ice Queen (located near ::home teleport).

Achievements
The Achievements tab offer a set of tasks and challenges that can be completed to obtain rewards and various benefits (Achievements cape).
SpoilerBy completing your achievements you'll be rewarded prizes depending on the difficulty of each task. These tasks are divided by Daily, Weekly and overall Achievements.
To check them out go to your Achievements tab - View Achievements (marked in yellow)

Amethyst
Amethyst is a type of mineral mined from amethyst crystals. Mining it requires the player to have a Mining level of 92. This method requires little to no effort compared with the others presented, being very easy to afk.
SpoilerLocation
Using the Spiritual fairy tree located at Home (marked red on the minimap) choose the option Skilling -> Mining Guild.

Run south until u find the amethyst cyrstals (marked in red); The mining guild teleport is marked in yellow.
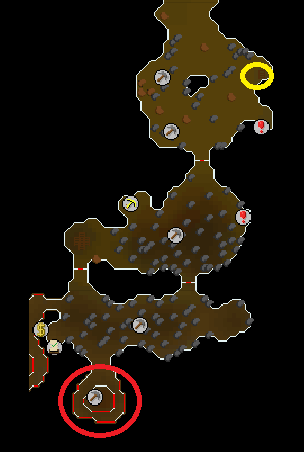
How much money can i make by mining amethyst?
In average you'll be able to mine 12 inventorys of amethyst in 1 hour (336 amethyst). These can be sold on the trade post for an average of 75k each or converted into amethyst javelins (which can be sold to Vannaka for 10k each).
Caution: A membership bond (Premium rank) is required to access the amethyst crystals.
Note: If you have a correction for the guide or have a suggestion for a new method, please leave a message on the comment section.
Caution: You should always research the items and methods before trying these methods. Because of constantly changing prices of items, the estimated profit may be inaccurate.
3


 Bird Snares -
  Box Trap -


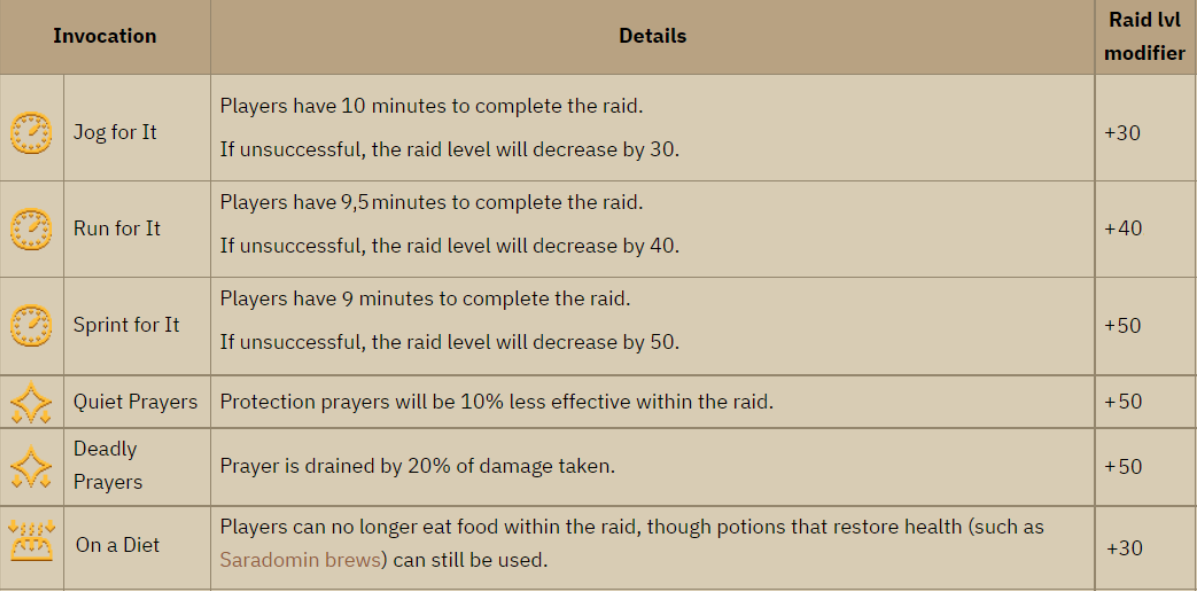


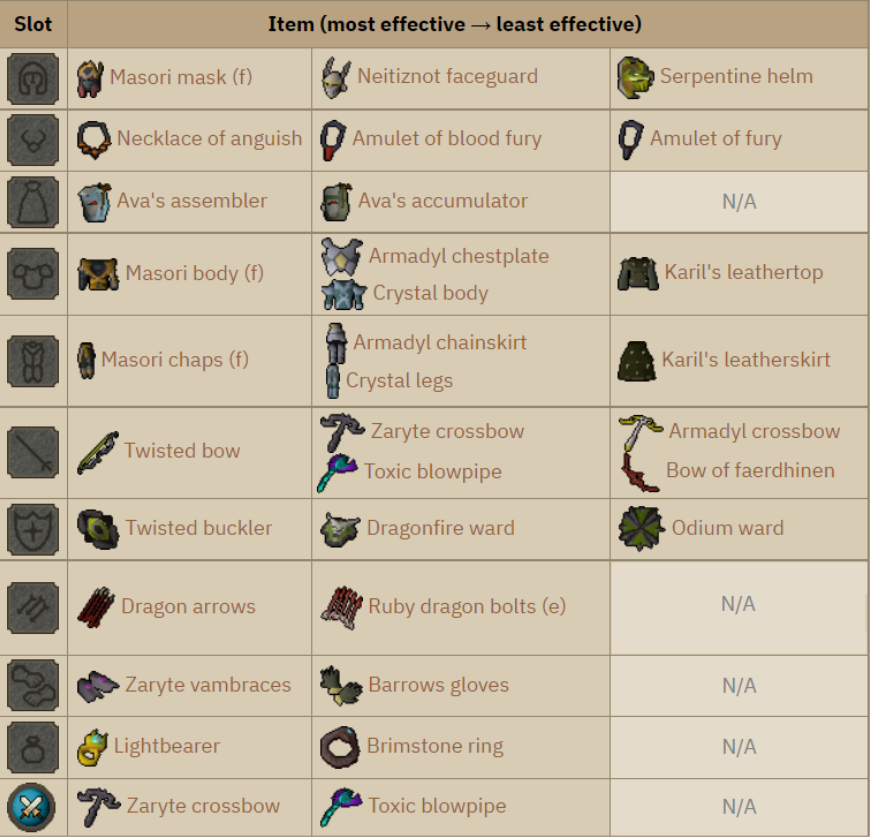


Ultracompost?
in General Discussion
Posted
You can buy it from one of the npcs in the Farming Guild